VR teleoperation
Excerpted from the supplied English User Manual v1.4. Chinese editorial corrections and later confirmations may not be synchronized. Check the Chinese reference where the two differ.
Configuration: dual-arm details apply only to dual-arm/mobile dual-arm robots. Older instructions differ in power timing, light names and homing motion; check the operational guidance and version notes on this page.
Confirmed X/A timing: after initial startup hold X+A to home and hold for more than one second to unlock. Subsequently hold for more than one second to home; tap X or A for approximately 0.1 seconds to unlock. Illustrations may show older timings.
5 VR Device and Dual-Arms Teleoperation Instructions
5.1 VR controller Buttons
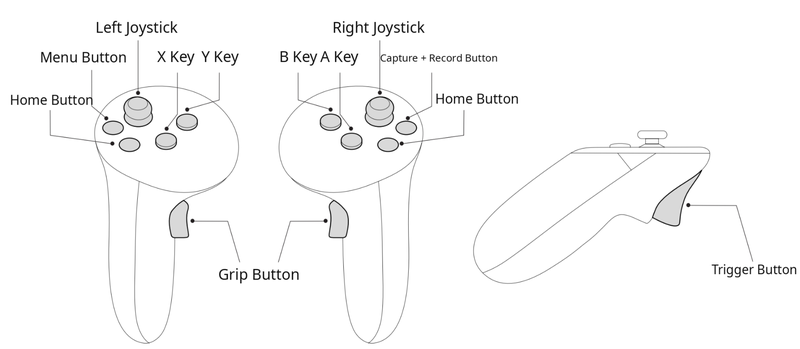
5.2 VR controller Commands
| Dual-Arms | |||
|---|---|---|---|
| Concept | Command Description | Prerequisite | Button |
| Start VR Teleoperation | Enters the initial zero position for VR teleoperation from the idle-state posture; the grippers also perform zero calibration. | Robot is in VR Teleoperation Mode | Long-press (>1 s) the X button on the left controller and the A button on the right controller simultaneously |
| Return to Initial Teleoperation Zero Position | During teleoperation, use the VR controllers to return the arms to the initial zero position (elbows folded forward 90°). | VR teleoperation working state | Long-press (>1 s) the X button on the left controller and the A button on the right controller simultaneously |
| End-Effector Following | Hold the VR controllers; the robotic arm tips follow. | VR teleoperation initial zero state / VR teleoperation working state | None |
| End-Effector Lock | During VR teleoperation, an arm can be paused; a typical use is holding the other arm fixed for one-handed operation. - In the zero-return locked state, simultaneously click the X button on the left controller and the A button on the right controller- During teleoperation, click the X button on the left controller to pause the left arm; click again to resume- During teleoperation, click the A button on the right controller to pause the right arm; click again to resume | VR teleoperation initial zero state / VR teleoperation working state | Short-press the X button on the left controllerShort-press the A button on the right controller |
| Gripper Control | Remotely closes and opens the grippers; one short press closes/opens the gripper. | VR teleoperation initial zero state / VR teleoperation working state | Left/right Trigger Button |
| Start Data Collection | Starts collecting teleoperation data When the VR device receives the data-collection start signal from the robot, the VR controllers vibrate for feedback and the Data Collection platform status updates synchronously. | VR teleoperation working state | B button on the right controller |
| Stop Data Collection | Stops collecting teleoperation data When the VR device receives the data-collection stop signal from the robot, the VR controllers vibrate for feedback and the Data Collection platform status updates synchronously. | VR teleoperation working state | Y button on the left controller |
| Mobile Base | |||
| Concept | State Description | Prerequisite | Button |
| Chassis Mode Selection | Selects Ackermann Mode or Diagonal Movement Mode for the chassis | VR teleoperation working state | The default out-of-box mode is Ackermann Mode Long-press the right joystick for 1 s to switch to Diagonal Movement ModeLong-press the left joystick for 1 s to switch to Ackermann Mode |
| Forward Movement | Robot moves forward | VR teleoperation working state | Push the left joystick forward |
| Backward Movement | Robot moves backward | VR teleoperation working state | Push the left joystick backward |
| Ackermann Rotation | In Ackermann Mode, the drive wheels rotate to turn the chassis | VR teleoperation working state | In Ackermann Mode, push the right joystick left/right |
| Diagonal Movement | In Diagonal Movement Mode, the chassis does not rotate; the drive wheels turn and the chassis moves diagonally left/right | VR teleoperation working state | In Diagonal Movement Mode, push the right joystick left/right |
| Speed Adjustment | The Mobile Base speed can be adjusted with the joystick | VR teleoperation working state | The farther the left joystick is pushed forward/backward, the higher the speed. Stroke 0 means speed 0; maximum stroke means maximum speed. |
| Parking State | When the robot needs to remain stopped at a fixed position for a long time (such as parking or performing fixed-table tasks), switch the chassis to Parking State. The four wheels lock in an X-shaped four-wheel steering configuration. | VR teleoperation working state | Long-press the Grip Button on the left controller and the right joystick simultaneously for 1 s |
| Emergency Stop | For the TRON 2 dual-arm configuration with a Mobile Base, the Mobile Base also stops immediately when emergency stop is triggered. | VR teleoperation working state | VR controllers Press the VR left and right joysticks simultaneouslyRemote Controller Press the left and right joysticks simultaneously |
| Lift Stand | |||
| Concept | State Description | Prerequisite | Button |
| Raise | Controls the stand to raise the robot height | VR teleoperation working state | Hold the Grip Button on the right controller and push the left joystick forward |
| Lower | Controls the stand to lower the robot height | VR teleoperation working state | Hold the Grip Button on the right controller and push the left joystick backward |
| Return to Zero | Sends a command to return the stand to the zero position (the zero position is the top end of the stand, making battery removal easier). | VR teleoperation working state | Long-press the Grip Button on the right controller and the left controller joystick simultaneously for 1 s |
5.3 Teleoperation Preparation
5.3.1 Dual-Arms Zero Calibration
Tip:
- Zero calibration is required only after the main controller has been upgraded or after severe impact causes zero-position loss or position drift.
- In the mobile chassis configuration, raise the robot to the highest point before performing zero calibration.
- After zero calibration is complete, wait about 5 seconds while the robot refreshes the new zero-position information before performing other operations.
- Press
L1+Xto ensure the dual arms are in idle state and hanging naturally; - Press
L1+R1on the remote controller to start automatic zero calibration. After calibration ends, the dual arms should hang naturally; - If the indicator turns red during the process, zero calibration has failed. Try calibrating again.
5.3.2 Switching the TRON2 Robot to Teleoperation Mode
Press R1+Right button on the remote controller to switch to Teleoperation Mode.
5.3.3 Starting the Teleoperation App on the VR Device
Note: Do not remove the protective sticker covering the detection sensor before teleoperation use (otherwise the headset may frequently enter sleep mode).
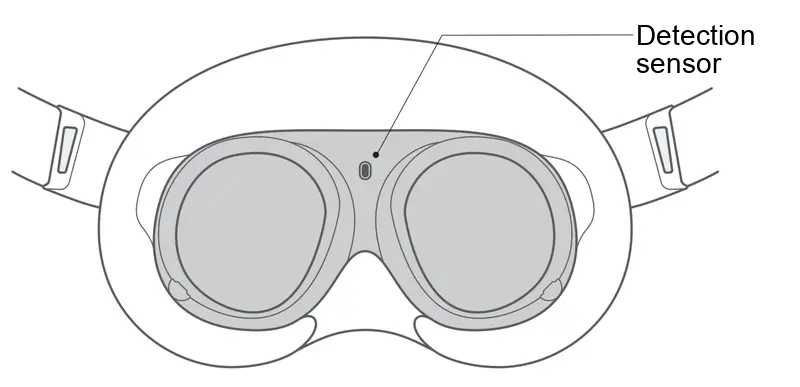
- When connecting the VR device to the robot for the first time, wear the VR Headset and complete the following settings in the VR interface.
- Tip: Point with the right-hand controller. Short-press the Trigger Button on the right-hand controller to select or confirm.
| Step | Operation | Illustration |
|---|---|---|
| 1. Power on the VR device | Press and hold the Power Button on the right side of the Headset for approximately 3 seconds to power on, then put on the Headset to enter the system home screen | 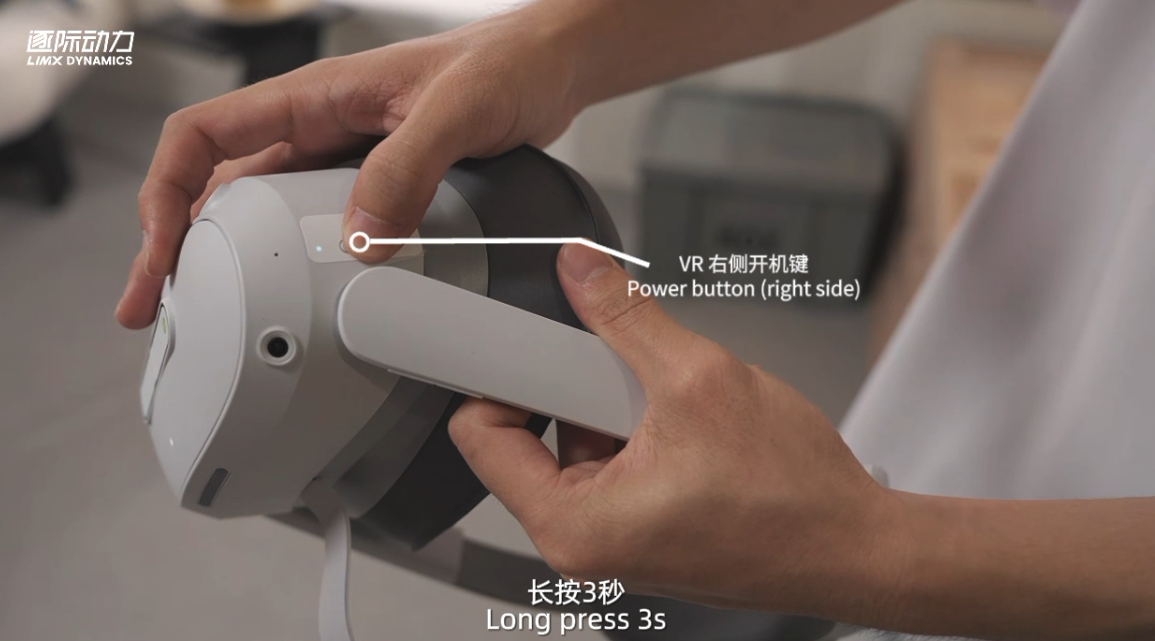 |
| 2. Connect to the robot Wi-Fi | In the quick panel / Settings, connect to TRON2A_XXX_2.4G or TRON2A_XXX_5G with password 12345678 | |
| 3. Start the teleoperation app | Library > Unknown Sources > Limx_teleop | |
| 4. Configure and connect | Select tron2-offline, enter 10.192.1.2 as the IP, and click Connect |
NOTICE: For local teleoperation, we recommend disconnecting the robot from external Wi-Fi networks. Keep only the robot's 5 GHz Wi-Fi network enabled for the VR device.
If the VR device is connected to the robot's 5 GHz Wi-Fi network while the robot is also connected to an external 5 GHz Wi-Fi network, the two networks may interfere with each other. This can cause video latency, sluggish controls, or jitter. If the robot needs to connect to an external network, use a 2.4 GHz Wi-Fi network and keep the VR device connected to the robot's 5 GHz Wi-Fi network.
- Click Connect to enter the TRON 2 teleoperation working state. The default see-through view displays the head camera and the left and right wrist camera feeds. The wrist camera feeds can be toggled on or off in the lower-right corner.
Note: If prompted whether to enable body following during the process, select No.
- Hang the VR headset horizontally around your neck, as shown below. Hold the VR controllers in your hands, ready for teleoperation.
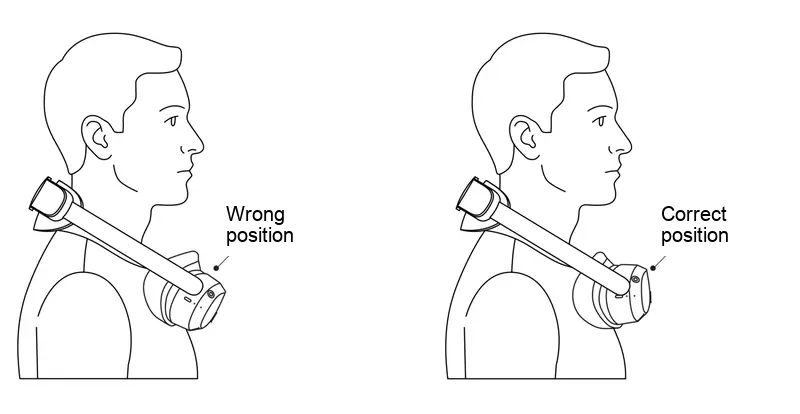
5.4 Using Teleoperation
5.4.1 Dual-Arms Zero Return: Entering the Ready Posture
Long-press the left X button + right A button simultaneously for at least 1.0 s. After zero return is complete, the dual arms enter the teleoperation ready state, with the forearms extended forward at 90° to the upper arms. This operation can also be performed during teleoperation to return the dual arms to the ready state.
Right after startup, entering the teleoperation ready state requires long-pressing the
left X button + right A buttonsimultaneously for about 3.0 s.
5.4.2 Entering Teleoperation Working State
Dual-arm motion unlock: Hold the controllers with both hands, keep your arms close to the robot arms' posture, and hold the controllers level and pointing forward. Simultaneously short-press X+A for about 0.2 s to unlock the dual arms. The arm tips then start following the controllers, and the robot enters the teleoperation working state.
⚠️ When operating for the first time, use small, slow movements. Avoid sudden large movements of the controllers, which can cause the robotic arms to swing rapidly or strike nearby objects. The teleoperation link introduces a latency of about 100 ms; allow a lead time for your movements.
5.4.3 Gripper Grasping
Press the left trigger button/right trigger button to open the left/right gripper; press again to close it.
5.4.4 Mobile Base and Lift Stand Control
At this point, the Mobile Base and Lift Stand can be controlled normally according to the VR controller commands.
6.4 Remote Teleoperation Configuration
After completing the following settings, you can use a VR device to teleoperate a bound robot over an external network.
Before proceeding, complete the settings in 6.3 dual-arm to an External Network, and make sure both the robot and the VR device are connected to an external network.
6.4.1 Binding the Robot
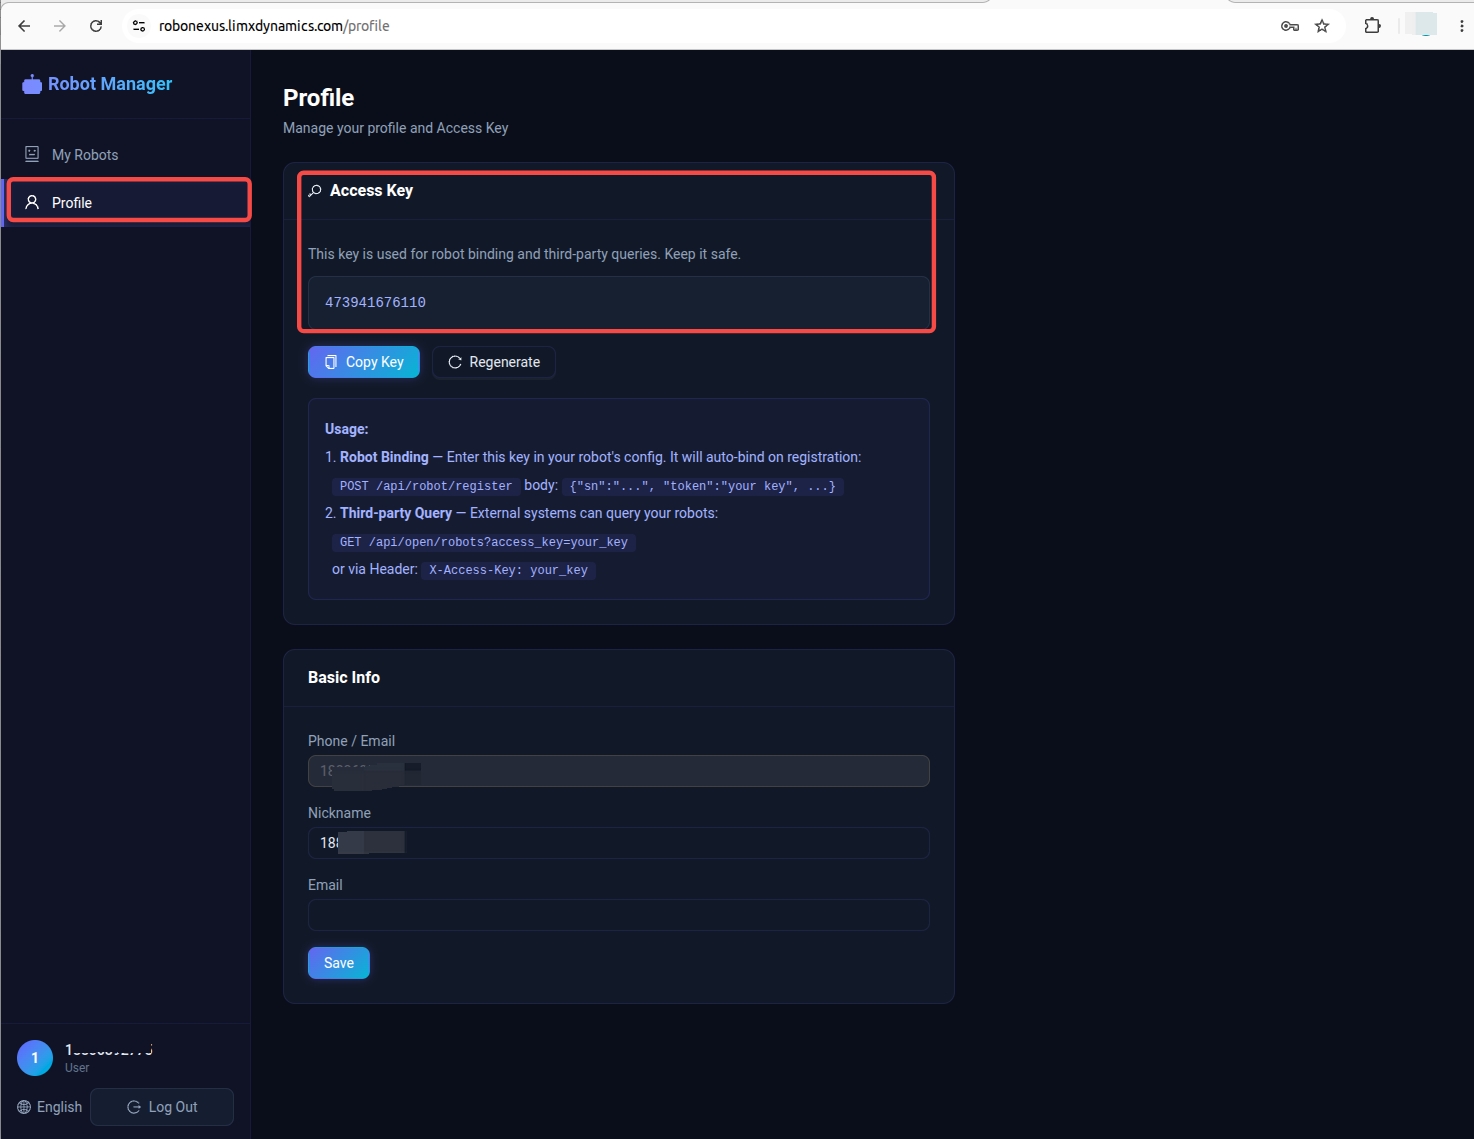
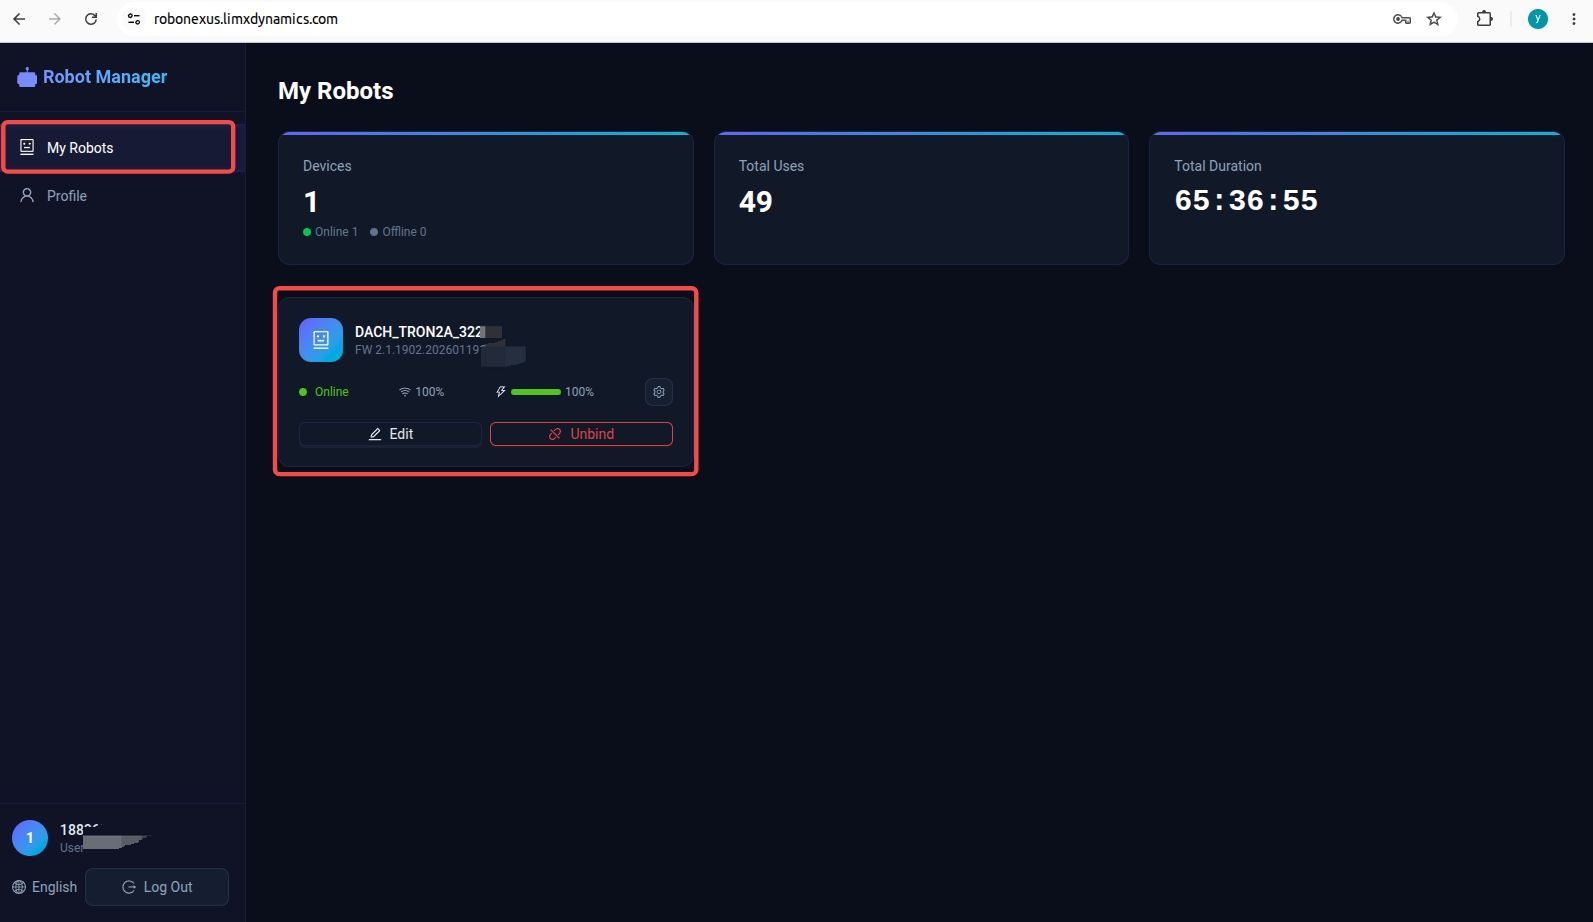
1.Access the Robot Management Platform at http://robonexus.limxdynamics.com/ over the external network. Register and log in to your account, then obtain the Access Key on the personal information page.
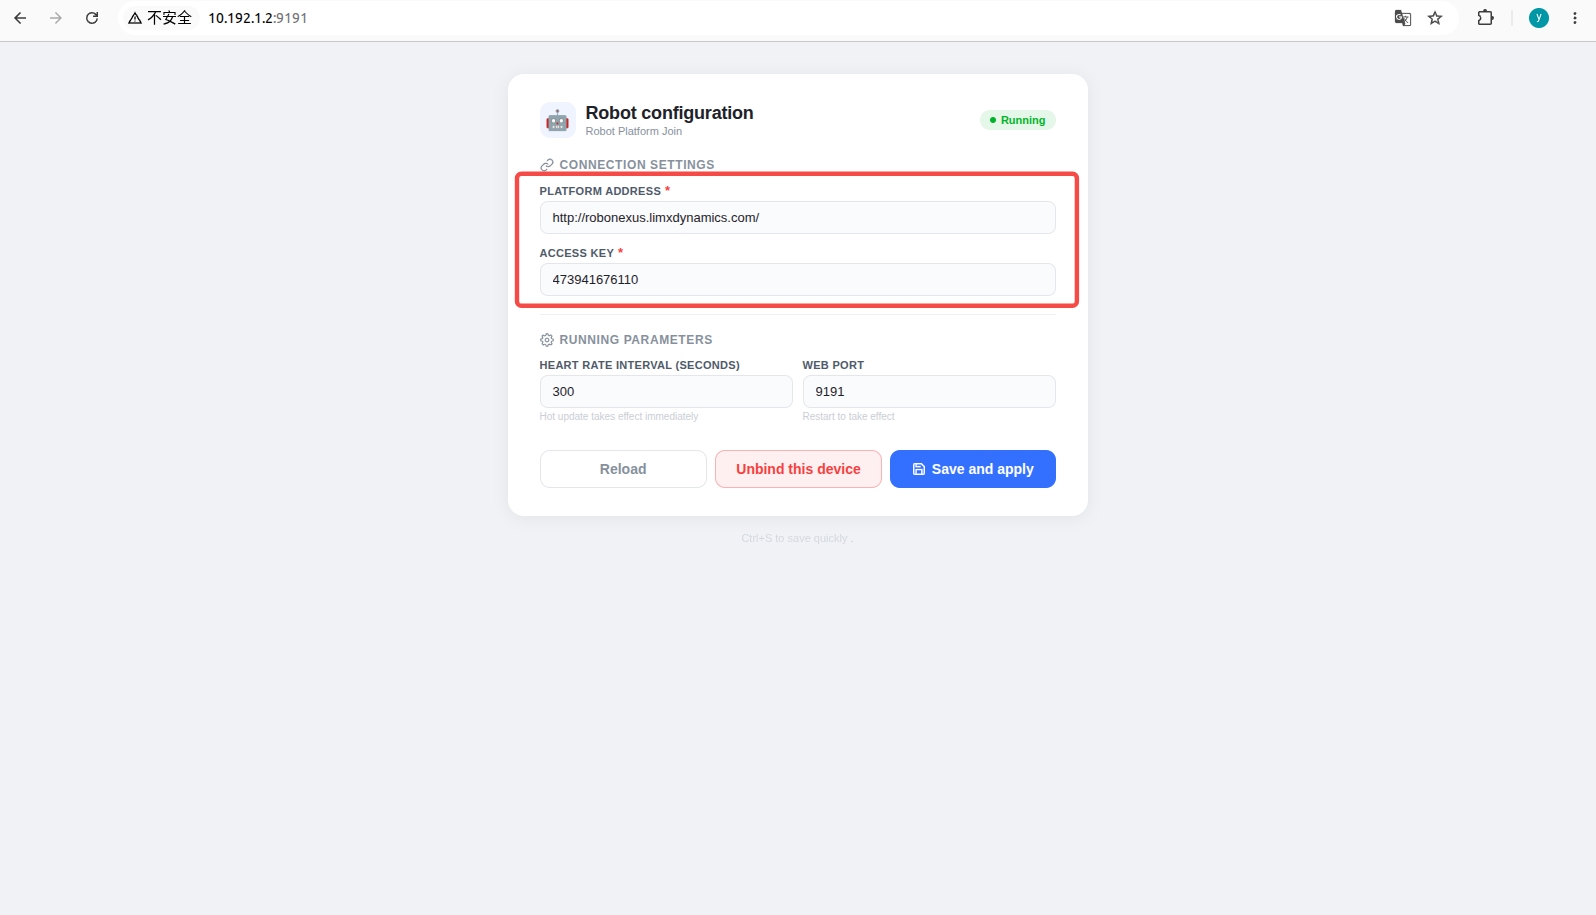
2.Connect to the robot via Wi-Fi or the Ethernet port, then access the Remote Teleoperation Configuration page at http://10.192.1.2:9191 in a browser. Enter the platform address http://robonexus.limxdynamics.com/ and your account's Access Key, then save and apply the configuration.
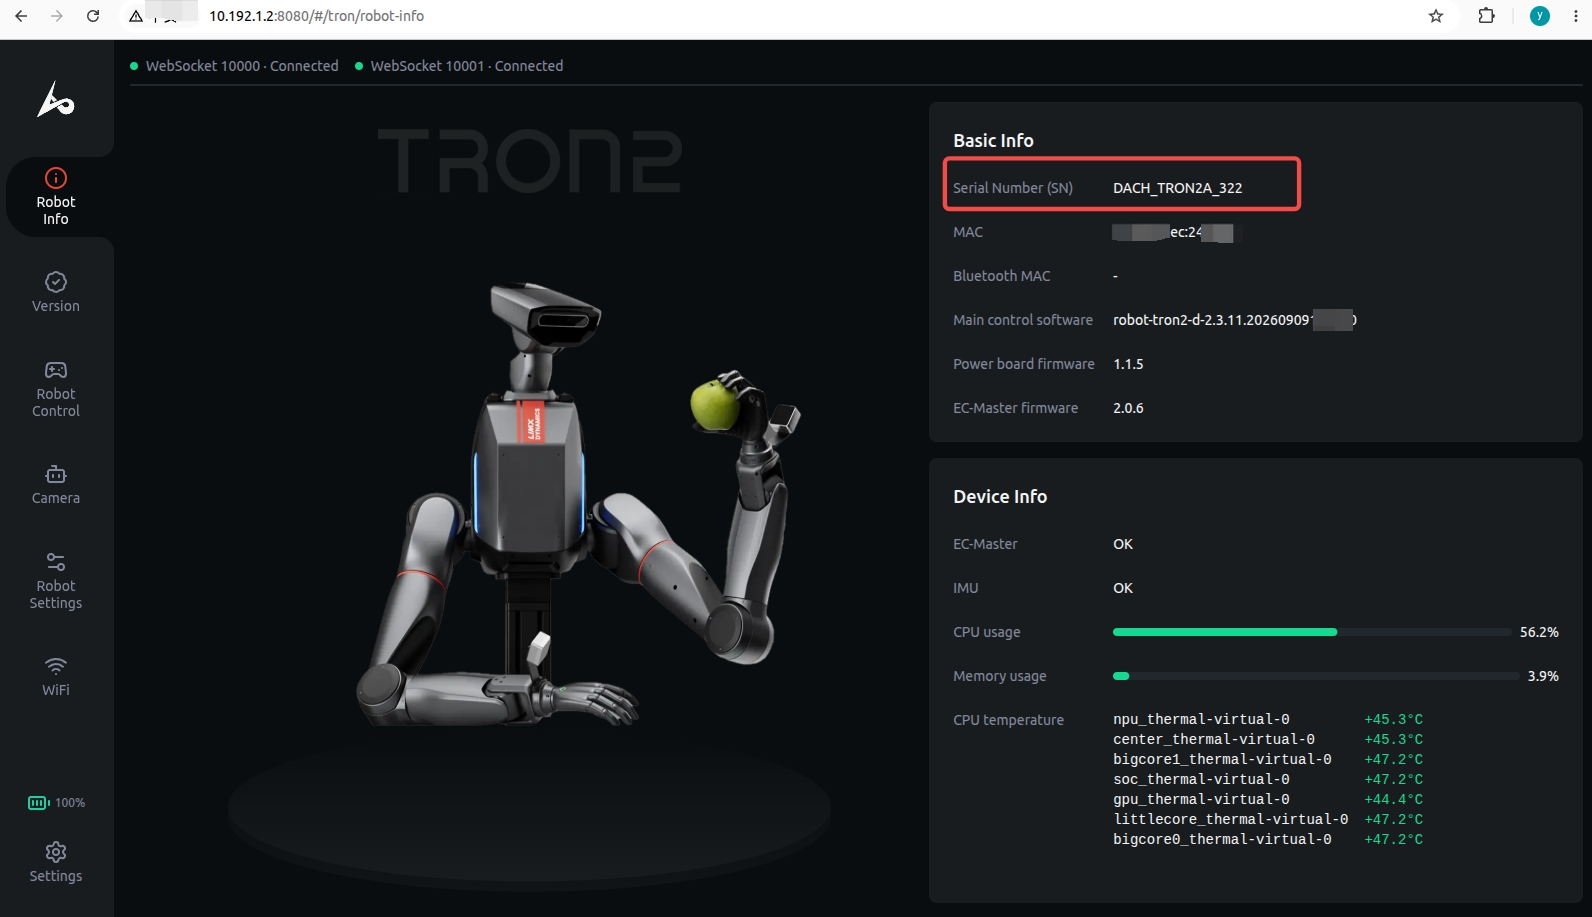
 3.Access the robot management page at http://10.192.1.2:8080, and record the robot's Serial Number (SN) under "Robot Information".
6.4.2 Connecting the VR Device
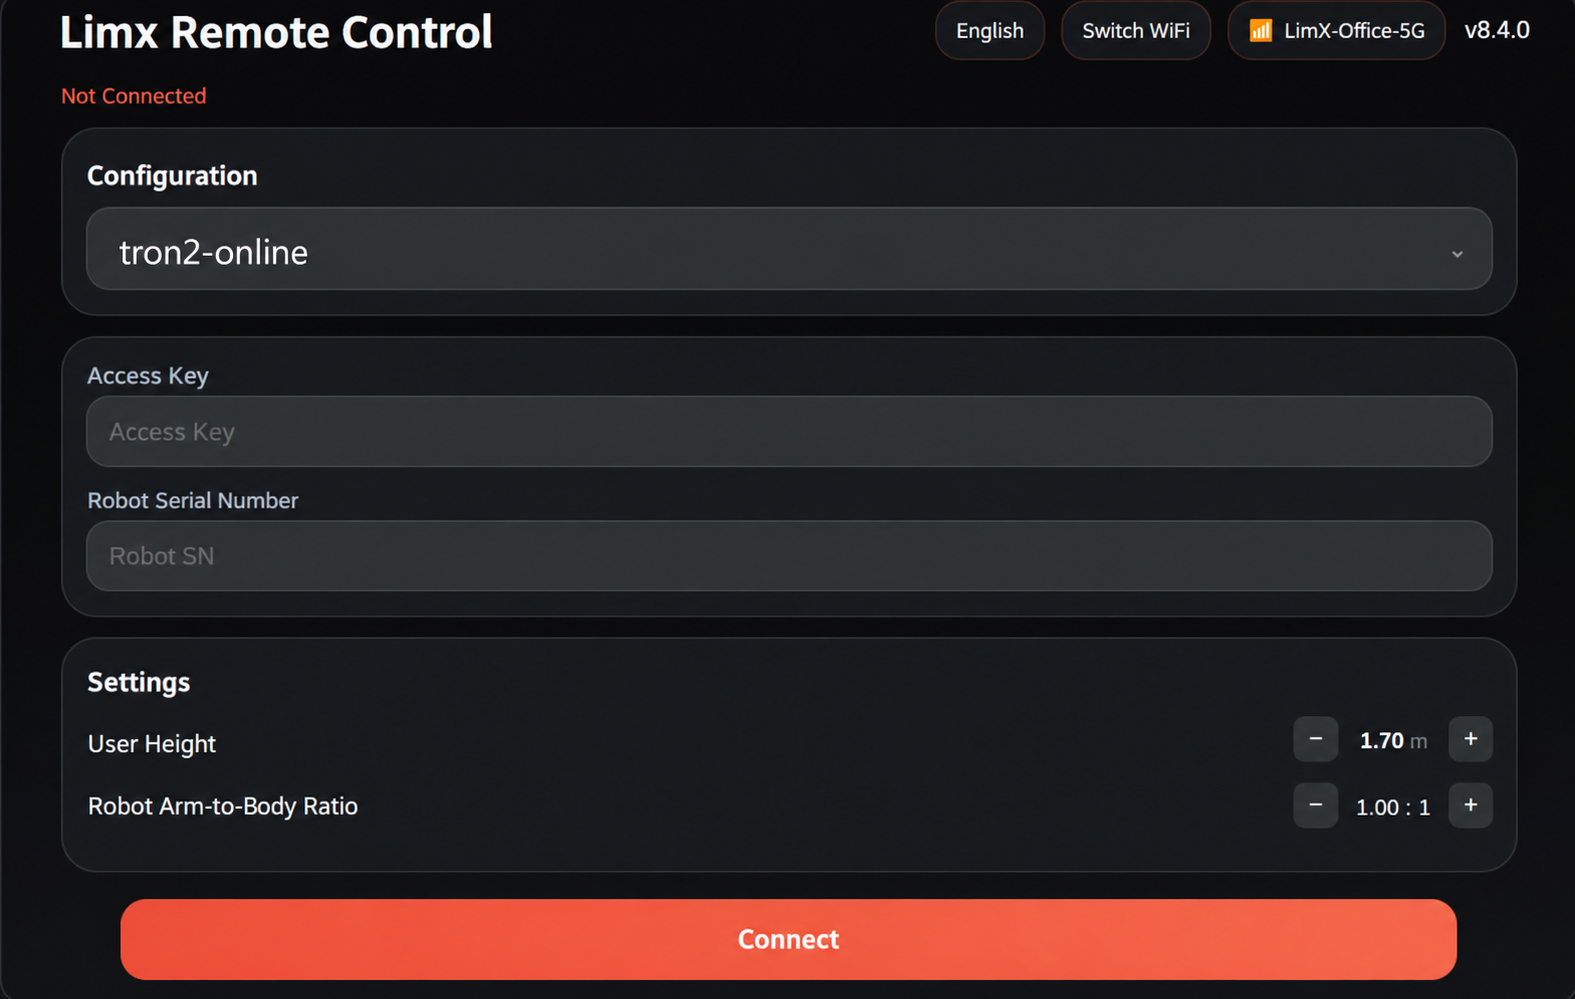
- Open the teleoperation app on the VR device and select connection via an external network.
- Select
tron2-onlineas the configuration, enter your account's Access Key and the robot's serial number, then click "Connect".
 3.After the connection succeeds, the Robot Management Platform displays the robots currently available for remote teleoperation.
5.4.2 Entering Teleoperation Working State
Dual-arm motion unlock: Hold the controllers with both hands, keep your arms close to the robot arms' posture, and hold the controllers level and pointing forward. Simultaneously short-press X+A for about 0.1 seconds to unlock the dual arms. The arm tips then start following the controllers, and the robot enters the teleoperation working state.
Dual-arm configuration details · 5.2.1 Dual Arms
| Function | Description | Prerequisite | Button |
|---|---|---|---|
| Start VR Teleoperation | Moves the arms from Idle to the initial teleoperation zero position and performs Zero Calibration for the grippers | Robot is in VR Teleoperation Mode | Press and hold the X button on the left controller and the A button on the right controller simultaneously for more than 1 second |
| Return to Initial Teleoperation Position | Returns the arms to the initial zero position with the elbows bent forward at 90 degrees | VR teleoperation operating state | Press and hold the X button on the left controller and the A button on the right controller simultaneously for more than 1 second |
| End-Effector Tracking | The arm end effectors track the left controller and right controller | Initial teleoperation position or operating state | None |
| End-Effector Lock | Locks either arm during teleoperation. At the zero-position lock, press the X button on the left controller and the A button on the right controller simultaneously. During teleoperation, press X to pause/resume the left arm or A to pause/resume the right arm. | Initial teleoperation position or operating state | Short-press X on the left controller or A on the right controller |
| Gripper Control | Short-press to close or open the corresponding gripper | Initial teleoperation position or operating state | Trigger button (T button) on the left controller/right controller |
| Start Data Collection | Starts recording teleoperation data. The controllers vibrate and the data platform status updates. | VR teleoperation operating state | B button on the right controller |
| Stop Data Collection | Stops recording teleoperation data. The controllers vibrate and the data platform status updates. | VR teleoperation operating state | Y button on the left controller |
Dual-arm configuration details · 5.2.2 Mobile Base
| Function | Description | Prerequisite | Button |
|---|---|---|---|
| Base Mode Selection | Selects Ackermann Mode or Diagonal Movement Mode | VR teleoperation operating state | Ackermann Mode is the default. Hold the joystick on the right controller for 1 second for Diagonal Movement Mode; hold the joystick on the left controller for 1 second for Ackermann Mode. |
| Move Forward | Moves the robot forward | VR teleoperation operating state | Push the joystick on the left controller forward |
| Move Backward | Moves the robot backward | VR teleoperation operating state | Pull the joystick on the left controller backward |
| Ackermann Steering | Rotates the drive wheels to turn the base in Ackermann Mode | VR teleoperation operating state | Push the joystick on the right controller left/right in Ackermann Mode |
| Diagonal Movement | Keeps the base orientation fixed while moving diagonally left/right | VR teleoperation operating state | Push the joystick on the right controller left/right in Diagonal Movement Mode |
| Speed Adjustment | Adjusts Mobile Base speed in proportion to joystick travel | VR teleoperation operating state | Push the joystick on the left controller forward/backward; greater travel produces greater speed |
| Parking | Locks all four steering wheels in an X pattern for extended stationary operation | VR teleoperation operating state | Hold the Grip button on the left controller and the joystick on the right controller for 1 second |
| Emergency Stop | Immediately stops the Mobile Base on a Mobile Dual-Arms Version | VR teleoperation operating state | Press the joystick buttons on the left controller and right controller simultaneously, or press both Remote Controller joystick buttons simultaneously |
Dual-arm configuration details · 5.2.3 Lifting Stand
| Function | Description | Prerequisite | Button |
|---|---|---|---|
| Raise | Raises the robot using the stand | VR teleoperation operating state | Hold the Grip button on the right controller and push the joystick on the left controller forward |
| Lower | Lowers the robot using the stand | VR teleoperation operating state | Hold the Grip button on the right controller and pull the joystick on the left controller backward |
| Return to Zero | Returns the stand to its uppermost zero position for battery removal | VR teleoperation operating state | Hold the Grip button on the right controller and the joystick on the left controller for 1 second |
Dual-arm configuration details · 5.3.1 Dual-Arm Zero Calibration
NOTICE
- Perform Zero Calibration only after a Main Controller upgrade or if a severe impact causes zero-position loss or position drift.
- On the Mobile Dual-Arms Version, raise the robot to its highest position before Zero Calibration.
- After Zero Calibration, wait approximately 5 seconds while the robot refreshes the new zero-position data before performing another operation.
- Press
L1+Xto ensure that both arms are in Idle and hanging naturally. - Press
L1+R1on the Remote Controller to start automatic Zero Calibration. When calibration is complete, both arms should hang naturally. - If the Status Indicator turns red during calibration, Zero Calibration failed. Try again.
Dual-arm configuration details · 5.3.2 Switching TRON 2 to VR Teleoperation Mode
After the robot starts, switch the Remote Controller to Idle. Modes can be switched only in Idle. Press R1+Right repeatedly until the Remote Controller displays Teleoperator. The robot is now in VR Teleoperation Mode, and its Status Indicator remains steady blue.
Dual-arm configuration details · 5.3.3 Starting the Teleoperation App on the VR Device
NOTICE: Do not remove the sensor cover sticker before use. Removing it may cause the headset to enter sleep mode frequently.
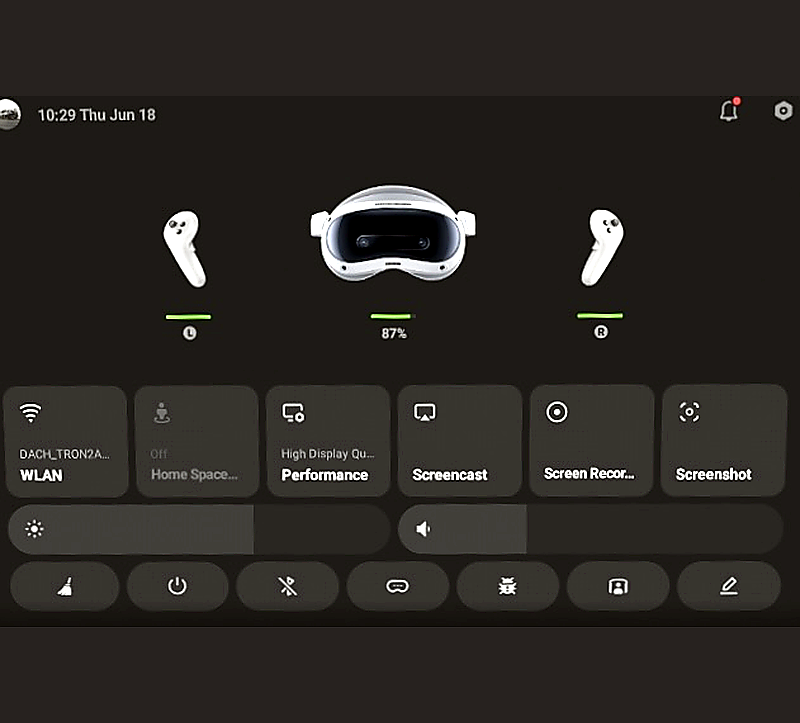
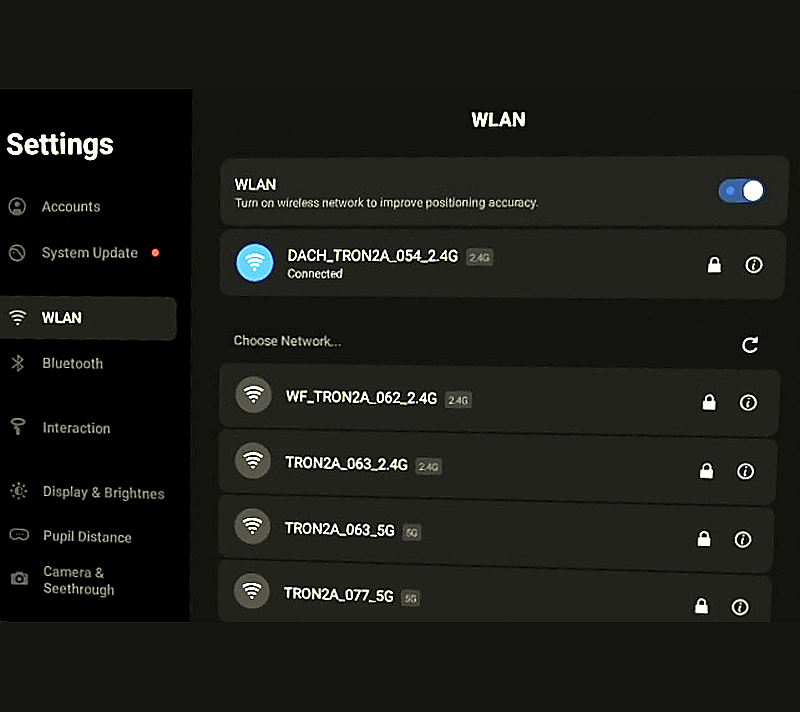
- Turn on the VR device and connect to the TRON 2 Wi-Fi network,
TRON2A_XXX_2.4GorTRON2A_XXX_5G. Enter password12345678.
-
In Library, select the installed
Limx_teleopapp. -
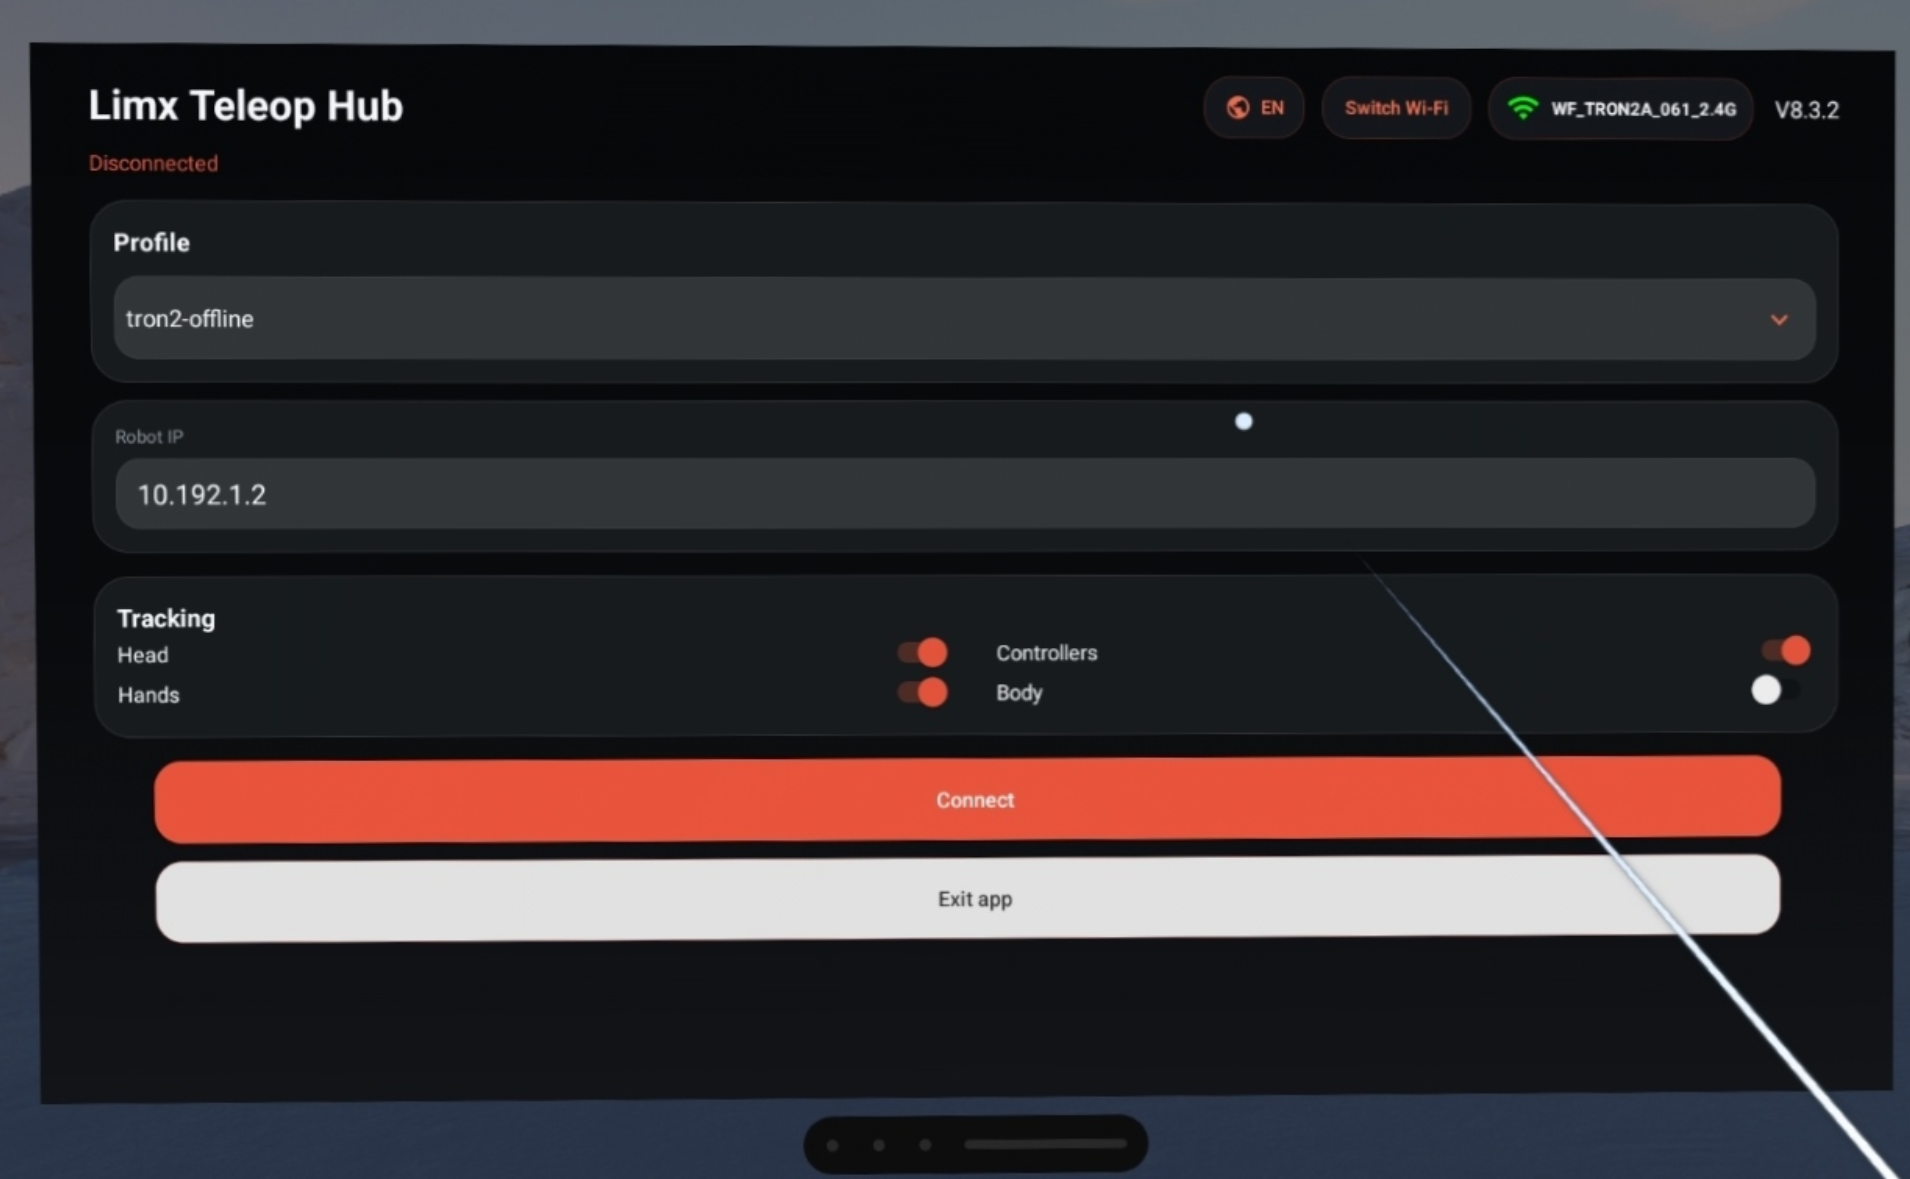
Select
tron2-offlineand enter robot IP address10.192.1.2. Keep the default tracking settings with Head, Controller, and Hand selected. Select Connect to enter the TRON 2 teleoperation operating state. The default perspective appears as shown below.
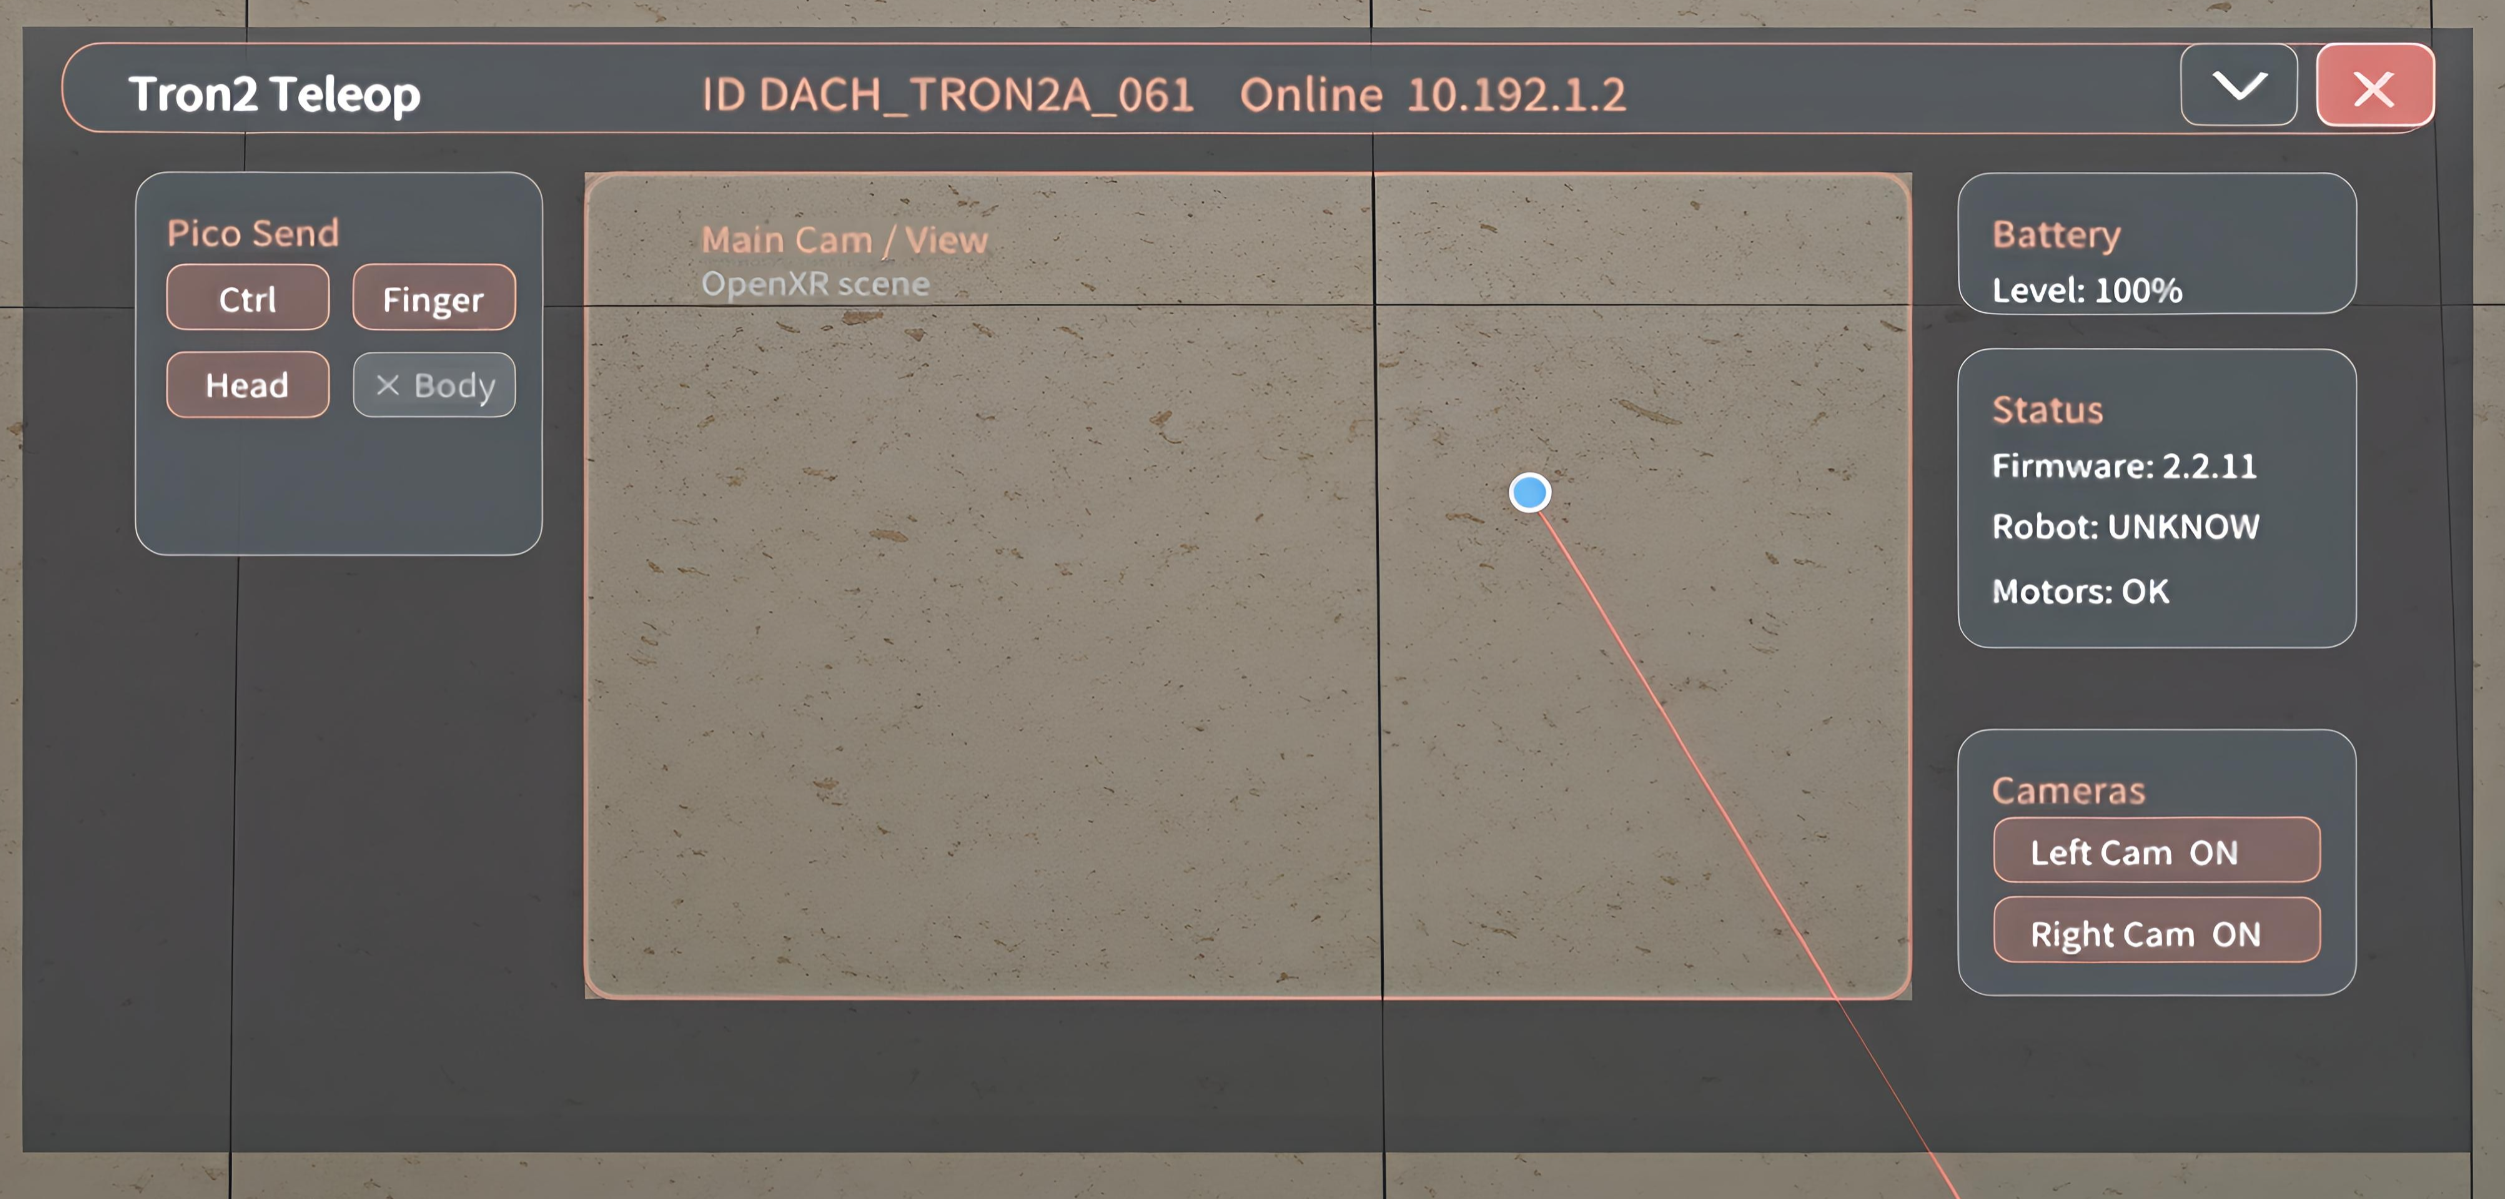
NOTICE: If prompted to enable body tracking, select No.
- Hang the VR headset horizontally around your neck as shown below, and hold the left controller and right controller.
Dual-arm configuration details · 5.4.1 Entering the Ready State
Press and hold the X button on the left controller + A button on the right controller simultaneously for 1.0 seconds to initiate the return-to-zero motion. When the motion is complete, both arms are in the teleoperation ready state, with the forearms extended forward at 90 degrees.
Dual-arm configuration details · 5.4.2 Starting Teleoperation
Hold the left controller and right controller with your arms in approximately the same pose as the robot arms and both controllers level and pointing forward. Short-press the X button on the left controller + A button on the right controller simultaneously for approximately 0.1 seconds to unlock the arms and enter the teleoperation operating state.
Dual-arm configuration details · 5.4.3 Returning Both Arms to the Ready State
Press and hold the X button on the left controller + A button on the right controller simultaneously for 1.0 seconds to return both arms to the initial forward-ready position.
Dual-arm configuration details · 5.4.4 Unlocking Both Arms
After a return-to-zero motion, both arms are locked by default. Short-press the X button on the left controller + A button on the right controller simultaneously for approximately 0.1 seconds to unlock them. The arm end effectors then track the controller positions.
Dual-arm configuration details · 5.4.5 Pausing/Resuming One Arm
Use this function to correct a large difference between the operator's arm pose and the robot arm pose.
- Short-press
Xto pause the left arm; short-press it again to resume. - Short-press
Ato pause the right arm; short-press it again to resume.
When resumed, the arm continues moving from the paused position.
Dual-arm configuration details · 5.4.6 Operating the Grippers
Short-press the Trigger button on the left controller/right controller to open the corresponding gripper. Press it again to close the gripper.
Dual-arm configuration details · 5.4.7 Controlling the Mobile Base and Lifting Stand (Mobile Dual-Arms Version Only)
The Mobile Base and Lifting Stand can now be controlled using the VR device commands described above.