Controller & display
Excerpted from the supplied English User Manual v1.4. Chinese editorial corrections and later confirmations may not be synchronized. Check the Chinese reference where the two differ.
Configuration: dual-arm details apply only to dual-arm/mobile dual-arm robots. Older instructions differ in power timing, light names and homing motion; check the operational guidance and version notes on this page.
4 Remote Controller Instructions
4.1 Remote Controller Power On/Off
- Turn on the remote controller: Press and hold the Power button for more than 2 s. When you hear a beep, the remote controller has turned on successfully and enters the default interface.
- Turn off the remote controller: Press and hold the Power button for more than 2 s. When you hear a beep, the remote controller turns off and the display goes dark.
4.2 Screen Information
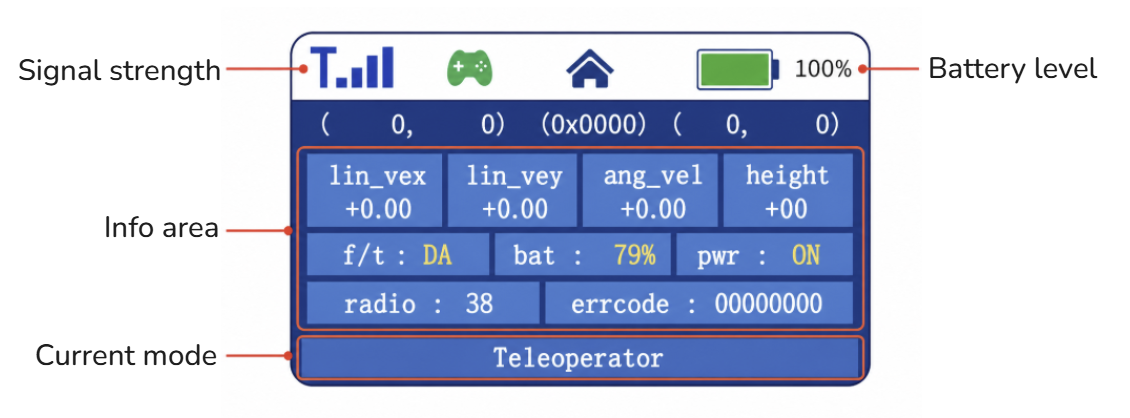
Signal Strength: When the remote controller is not connected to the robot, no signal icon is shown. After connection, blue signal bars are displayed. More lit bars indicate stronger signal.
Battery Level: Indicates the remote controller battery level
Information Area: Returns the robot's current mode, battery level, whether the robot is powered on, etc.
Current Mode/Status: High-Level Development(High-Level Developer Mode)/Low-Level Development(Low-Level Developer Mode)/Teleoperator(Remote-Control Mode)/show Mode/Idle(idle state in different modes)
4.3 Remote Controller Buttons
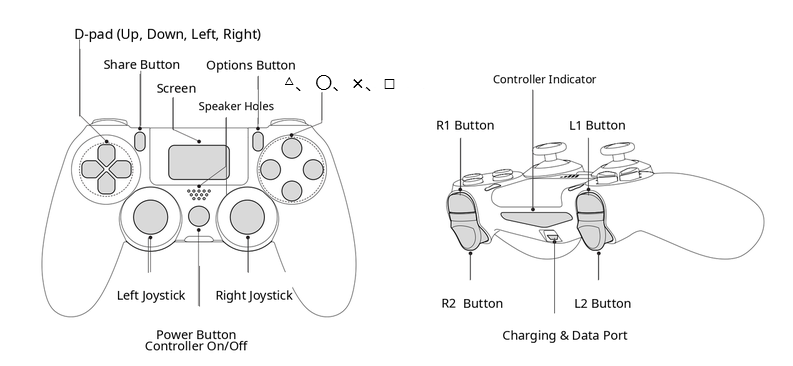
4.4 Dual-Arms/Mobile Dual-Arms Robot Remote-Control Commands
| Concept | Command Description | Prerequisite | Button | Notes |
| Mode Switching | Cycles through modes in the dual-arm configuration | Idle state | R1 + Right: Cycle forward through the modesR1 + Left: Cycle backward through the modes | After startup, the robot remains in the mode used before shutdown by default |
| Return Action | - In dual-arms mode, the homing action consists of the arms swinging outward and then hanging down naturally (if the safety protection function is enabled, this triggers the arm's table-avoidance action). - After completing the homing action, the robot automatically enters the idle state (the joint motors are in torque damping mode). | Effective only in Remote-Control Mode and High-Level Developer Mode | L1+X | |
| Enters the idle state directly | Does not execute the return action. All joint motors enter torque-damping state and slowly move downward. | Global | L1+ □ | Use only in emergencies when the return action fails |
| Emergency Stop Button | All motor drives are immediately powered off, but battery power and indicator lights remain on. The whole robot will drop. | Global | Press the left joystick + right joystick | Triggering emergency stop in any mode or state immediately cuts power to all motors |
| Emergency Stop Release | Motors power on again | Emergency Stop State | Press the Right joystick button | Single-clicking has no effect in other states. After release, the robot enters damping state. |
| Zero Calibration | Used to recalibrate joint zero positions | Idle state | L1+R1 | Zero calibration is required only after the main controller has been upgraded or after severe impact causes zero-position loss or position drift. |
4.5 Sole/Wheeled Robot Remote-Control Commands
| Command | Command Description | Prerequisite | Button | Notes |
| Mode Switching | Cycles through modes in the two-leg configuration | Idle state | R1 + Right: Cycle forward through the modesR1 + Left: Cycle backward through the modes | After startup, the robot remains in the mode used before shutdown by default |
| Enter Prepared State | Performs ground-contact/head-lift action | Idle state | L1+ ○ | |
| Enters the idle state directly | Does not execute the return action. All joint motors enter torque-damping state and slowly move downward. | Global | L1+ □ | Use only in emergencies when the return action fails |
| Stand Up in Place | The robot stands up from ready state | Ready state | L1+ △ | |
| Return Action | - In the sole/wheeled configuration, the return action is squat-and-fold. - After the return action is complete, the robot automatically enters idle state (joint motors are in torque-damping state). | Effective only in Remote-Control Mode and High-Level Developer Mode | L1+X | |
| Forward/Backward Movement | The robot moves forward/backward according to remote-control commands | Standing state | Left joystick up/down | |
| Left/Right Movement (sole only) | The robot moves left/right according to remote-control commands | Standing state | Left joystick left/right | |
| Turn in Place | The robot rotates clockwise/counterclockwise according to remote-control commands | Standing state | Right joystick left/right | |
| Height Adjustment | The user can adjust body height within the allowed range using the remote controller | Standing state | Hold R1 + Up/Down buttons.The robot descends/ascends at constant speed and stops when released. | After power cycling, the robot returns to the default position and does not remember the previous height setting |
| Flat-Ground/Stair Mode Switching (wheeled-biped only) | Switches between stair mode and flat-ground mode | Standing state | Press the Share button for 2 s | |
| Fall Recovery | Restores the robot to standing after an accidental fall | Fall detected | L2+ △ | This key combination has no effect when the robot is in normal state |
| Emergency Stop Button | All motor drives are immediately powered off, but battery power and indicator lights remain on. The whole robot will drop. | Global | Press the left joystick + right joystick | Triggering emergency stop in any mode or state immediately cuts power to all motors |
| Emergency Stop Release | Motors power on again | Emergency Stop State | Press the Right joystick button | Single-clicking has no effect in other states. After release, the robot enters damping state. |
| Zero Calibration | Used to recalibrate joint zero positions | Idle state | L1+R1 | Zero calibration is required only after the main controller has been upgraded or after severe impact causes zero-position loss or position drift. |
The TRON 2 Wheeled-Legs Configuration supports auto-recharge. For usage instructions, see the TRON 2 Auto-Recharge Base User Manual in the Documentation Center.
Tip:
After emergency stop is triggered, power to all motors is immediately cut off (confirm the emergency stop state before startup). a.Body emergency stop: The robot is in emergency stop state when the emergency stop button is pressed, and not in emergency stop state when it is released. After emergency stop is released, the robot must be powered on again to restore its state. b.Remote controller emergency stop: Pressing the
left and right joystickssimultaneously enters emergency stop state. Press theright joystick buttonto exit emergency stop state, and the robot state will automatically recover after a few seconds.
Dual-arm configuration details · 4.1 Powering the Remote Controller On and Off
- Power on: Press and hold the Power button for more than 2 seconds. One beep confirms startup, and the default screen appears.
- Power off: Press and hold the Power button for more than 2 seconds. One beep confirms shutdown, and the display turns off.
Dual-arm configuration details · 4.2 Display Information
- Signal strength: No signal icon appears when the Remote Controller is disconnected. After connection, blue signal bars appear; more bars indicate a stronger signal.
- Battery Level: Shows the Remote Controller Battery Level.
- Information area: Shows the current robot mode, robot Battery Level, and motor power status.
- Current mode/status: High-Level Development / Low-Level Development / Teleoperator / Idle.
Dual-arm configuration details · 4.4 Robot Remote-Control Commands
| Function | Description | Prerequisite | Buttons | Notes |
|---|---|---|---|---|
| Mode Switching | Cycles between VR Teleoperation Mode and Developer Mode in the Dual-Arms Configuration | Idle | R1+Right | At startup, the robot retains the mode used before shutdown |
| Homing Action | Lowers both arms naturally. If safety protection is enabled, the arms avoid the tabletop. The robot enters Idle after completing the motion, and the joint motors enter torque-damping state. | VR Teleoperation Mode or High-Level Development Mode | L1+X | / |
| Enter Idle | Enters torque-damping state without a Homing Action; all joints slowly move downward | Global | L1+□ | Use only in an emergency if the Homing Action does not work |
| Emergency Stop Button | Immediately cuts power to all motor drives. Battery power and indicators remain on, and the robot will drop. | Global | Left joystick button + right joystick button | Immediately cuts motor power in any mode or state |
| Emergency Stop Release | Restores motor power | Emergency Stop state | Right joystick button | Has no effect in other states; the robot enters damping state after release |
| Zero Calibration | Recalibrates joint zero positions | Idle | L1+R1 | Required only after a Main Controller upgrade or a severe impact causes zero-position loss or position drift |
NOTICE
- An Emergency Stop immediately cuts power to all motors. Confirm that Emergency Stop is released before startup.
- Body Emergency Stop: The robot is in Emergency Stop state when the Emergency Stop Button is pressed and exits it when the button is released. Power-cycle the robot after Emergency Stop Release.
- Remote Emergency Stop: Press both joystick buttons simultaneously to trigger Emergency Stop. Press the right joystick button to release it, then wait several seconds for the robot to recover automatically.