Battery & charging
Excerpted from the supplied English User Manual v1.4. Chinese editorial corrections and later confirmations may not be synchronized. Check the Chinese reference where the two differ.
Configuration: dual-arm details apply only to dual-arm/mobile dual-arm robots. Older instructions differ in power timing, light names and homing motion; check the operational guidance and version notes on this page.
2 Battery Level Check and Charging Instructions
2.1 Robot Battery Level Check and Charging
Checking the Robot Battery Level
Short-press the power button once to check the battery level.
Charging the Robot Battery
- Connect the battery charging dock and power adapter, align the aviation connector with the keyed position, and insert it.
- Insert the battery into the charging dock, press it down to ensure it is fully seated, and plug the power adapter into a power outlet (220 V AC).
- If the battery indicator flashes and the power adapter indicator is steady blue, charging has started. When the battery indicator and the power adapter indicator are both steady green, the battery is fully charged.
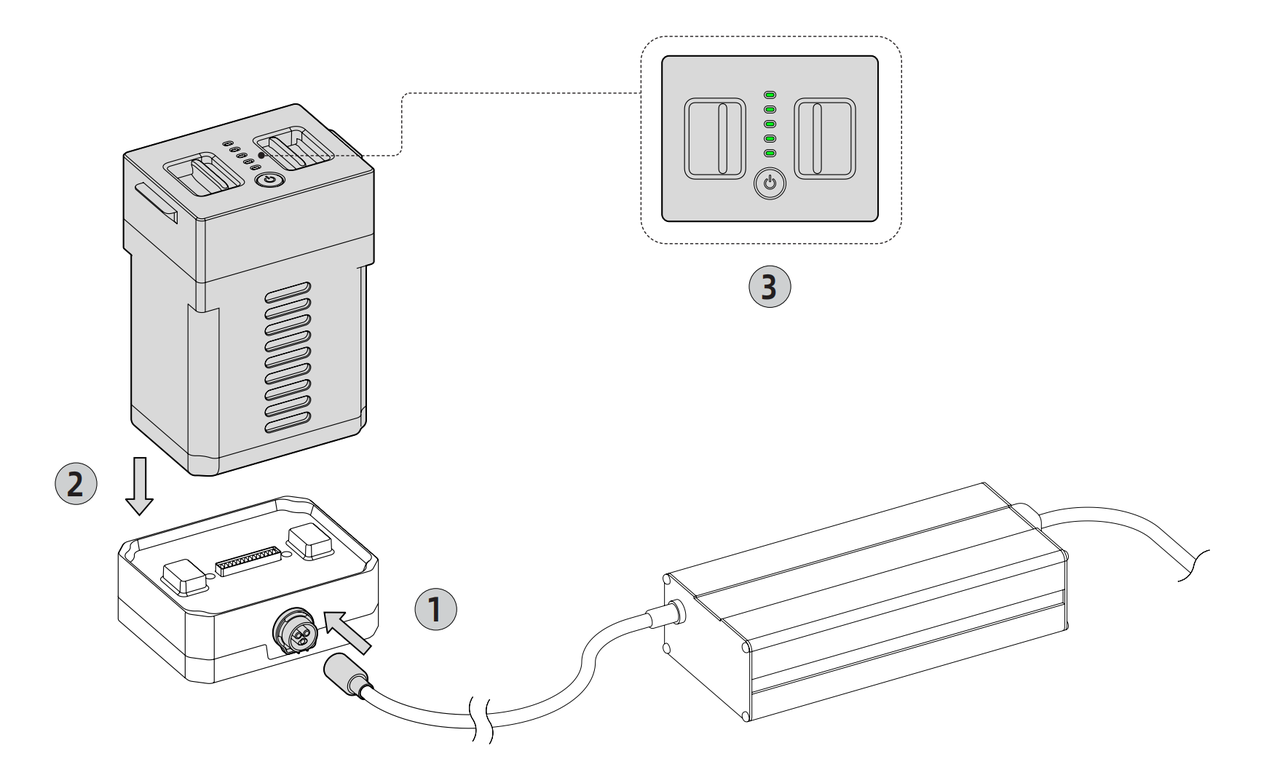
Battery and Adapter Indicator Lights
| Not Charging | Charging | Charging Complete | Charging Fault | |
|---|---|---|---|---|
| Battery | No light | Green flashing | Green steady | |
| Power Adapter | Green steady | Blue steady | Green steady | Red flashing |
Tip:
- If the device will not be used for an extended period, charge the battery once every three months to avoid battery damage.
- Long-term charging is not recommended. Remove the power adapter promptly after the battery is fully charged.
2.2 Remote Controller Battery Level Check and Charging
Checking the Remote Controller Battery Level
After long-pressing the Power button below the remote controller screen to turn it on, check the battery icon at the upper right of the screen.
Charging the Remote Controller
- Connect the Type-C end of the remote controller charging cable to the remote controller and connect the other end to a 5 V/1 A power supply.
- A steady green remote controller indicator means charging has started successfully.
Remote Controller Charging Indicator
| Not Charging | Charging / Charging Complete | |
|---|---|---|
| Remote Controller Indicator | No light | Green steady |
2.3 Mobile Bases Battery Level Check and Charging (Mobile Dual-Arms Version Only)
Checking the Mobile Bases Battery Level
The normal battery voltage range is 24-29.4 V. If the chassis LED flashes red, the battery voltage is too low. Charge it promptly.
Charging the Mobile Bases
Use the 10A charger provided with the product. Insert the charger plug into the charging port on the rear of the mobile base, then connect the charger to a power source. The robot will begin charging.
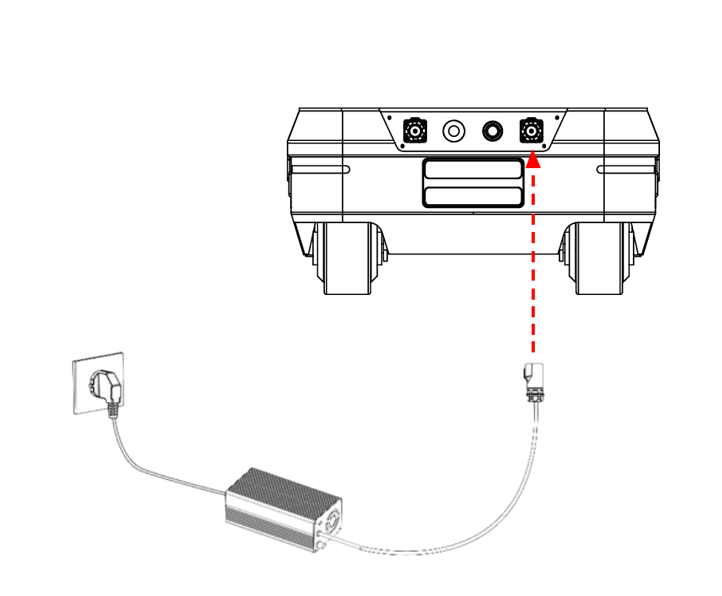
Dual-arm configuration details · 2.1.1 Checking the Robot Battery Level
Short-press the Power Button once to check the Battery Level.
Dual-arm configuration details · 2.1.2 Charging the Robot Battery
- Connect the Battery Charging Dock to the Power Adapter. Align the aviation connector with the keyed slot, and insert it.
- Insert the battery into the Battery Charging Dock. Press down until it is fully seated, then connect the Power Adapter to an AC outlet that meets the input rating marked on the Power Adapter.
- A flashing battery indicator and a steady blue Power Adapter indicator mean that charging has started. When the battery indicator and the Power Adapter indicator are both steady green, the battery is fully charged.
Dual-arm configuration details · 2.1.3 Battery and Power Adapter Indicators
| Indicator | Not Charging | Charging | Charging Complete | Charging Fault |
|---|---|---|---|---|
| Battery | Off | Green, flashing | Green, steady | |
| Power Adapter | Green, steady | Blue, steady | Green, steady | Red, flashing |
NOTICE
- If the device will not be used for an extended period, charge the battery once every three months to prevent battery damage.
- Do not leave the battery charging for an extended period. Disconnect the Power Adapter promptly after the battery is fully charged.
Dual-arm configuration details · 2.2.1 Checking the Remote Controller Battery Level
Press and hold the Power button below the screen to turn on the Remote Controller, then check the battery icon in the upper-right corner.
Dual-arm configuration details · 2.2.2 Charging the Remote Controller
- Connect the Type-C end of the charging cable to the Remote Controller and the other end to a 5 V/1 A power supply.
- A steady green Remote Controller indicator means that charging has started.
Dual-arm configuration details · 2.2.3 Remote Controller Charging Indicator
| Status | Not Charging | Charging/Charging Complete |
|---|---|---|
| Remote Controller Indicator | Off | Green, steady |
Dual-arm configuration details · 2.3.1 Checking the Mobile Base Battery Level
The normal Mobile Base battery voltage range is 24–29.4 V. A flashing red base LED indicates low battery voltage. Charge the battery promptly.
Dual-arm configuration details · 2.3.2 Charging the Mobile Base
Use the supplied 10 A charger. Insert the charger plug into the charging port at the rear of the base, connect the charger to power, and turn on the charger switch to start charging.