Auto-recharge
本页为双轮足自主回充基座的使用说明,内容搬运自 raw/tron-2/TRON2_Auto_Recharge_Base_User_Manual-zh.md §3、§4。该基座为配件,仅适配 TRON2 双轮足形态机器人;本页所有操作步骤均针对 TRON2 双轮足形态,不适用于其他形态。
3 运行状态说明
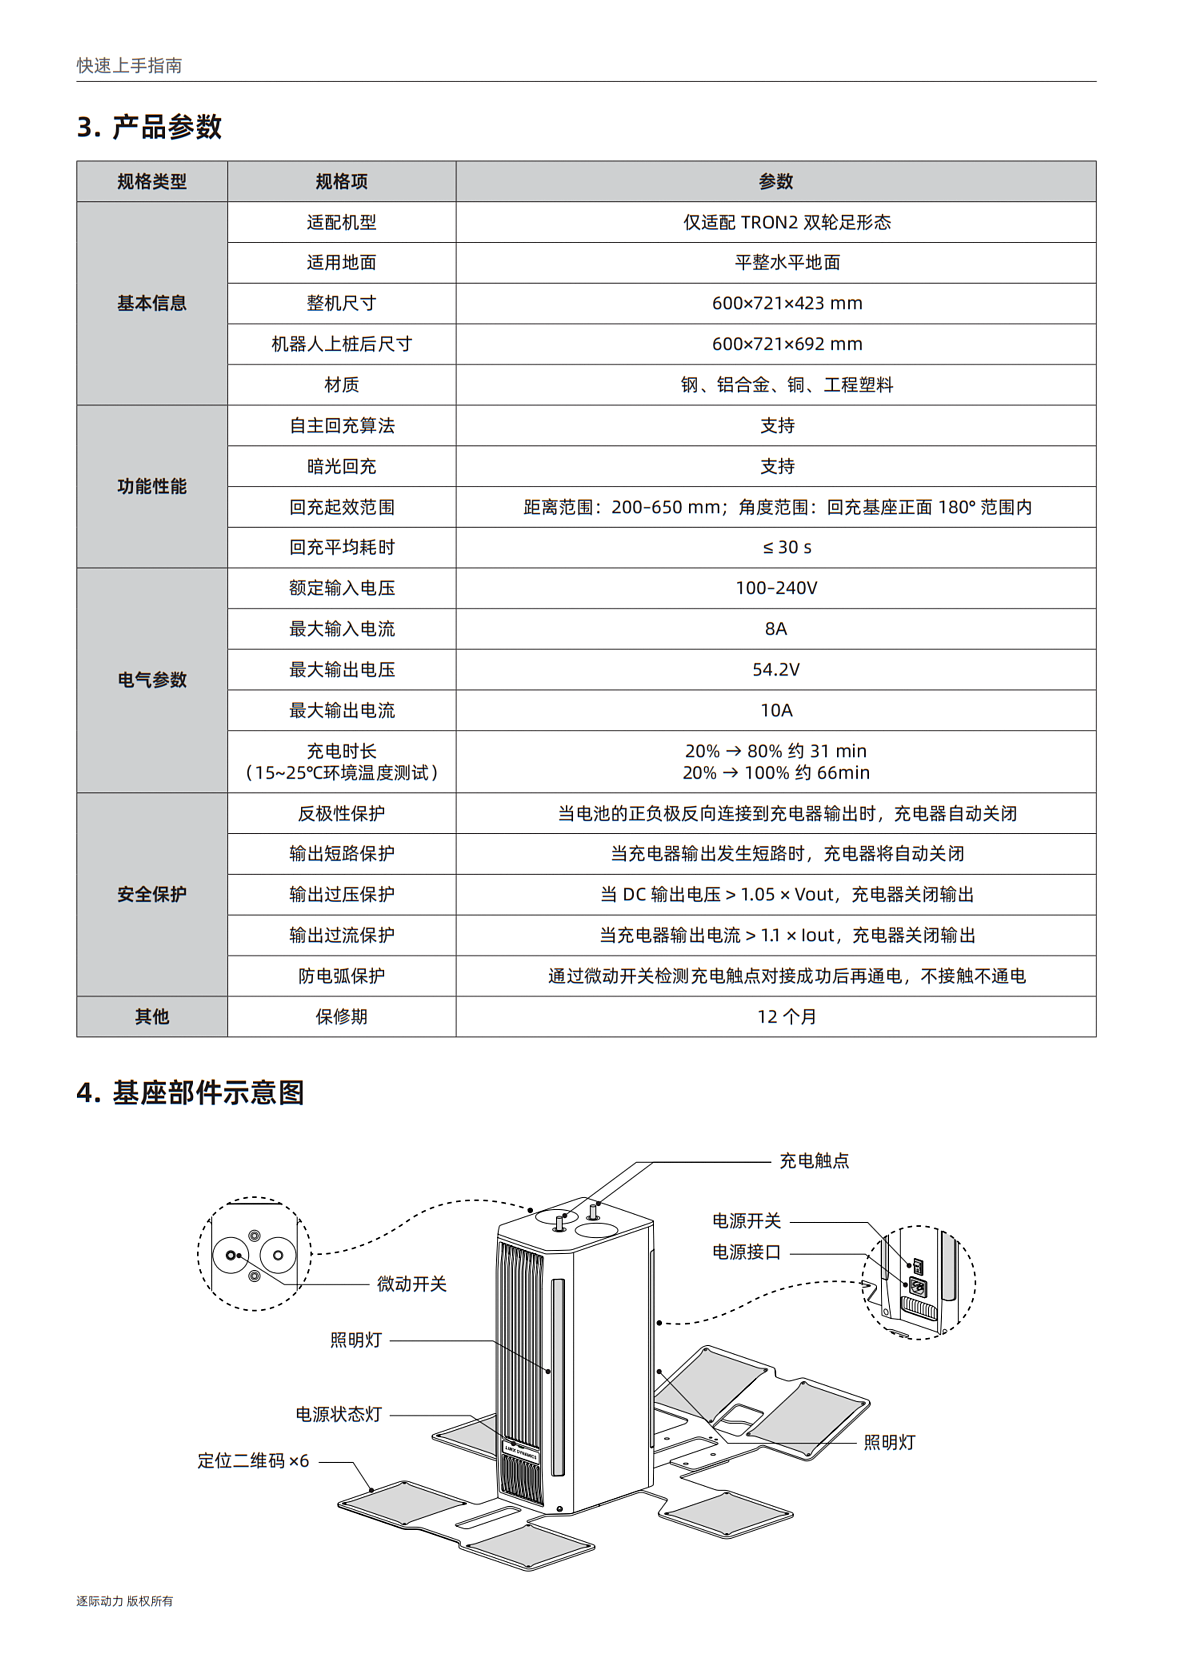
3.1 回充基座电源状态灯
回充基座本体正面有一个电源指示灯,用于反映当前充电桩的运行状态。
| 指示灯状态 | 含义 |
|---|---|
| 绿色常亮 | 已接通电源,处于空闲状态;或机器人坐桩且电池已充满 |
| 橙色常亮 | 正在充电 |
| 红色闪烁 | 充电桩异常检测 |
3.2 回充基座照明灯
回充基座正面布置有4条照明灯,用于辅助机器人视觉定位,仅在「开始回充」和「离开充电桩」两个过程中点亮,其它时间均处于熄灭状态。
-
对接成功进入「坐桩充电」后,照明灯自动熄灭。
-
离桩过程开始时再次点亮,机器人离开充电桩后熄灭。
4 使用说明
4.1 使用前准备
4.1.1 使用环境要求
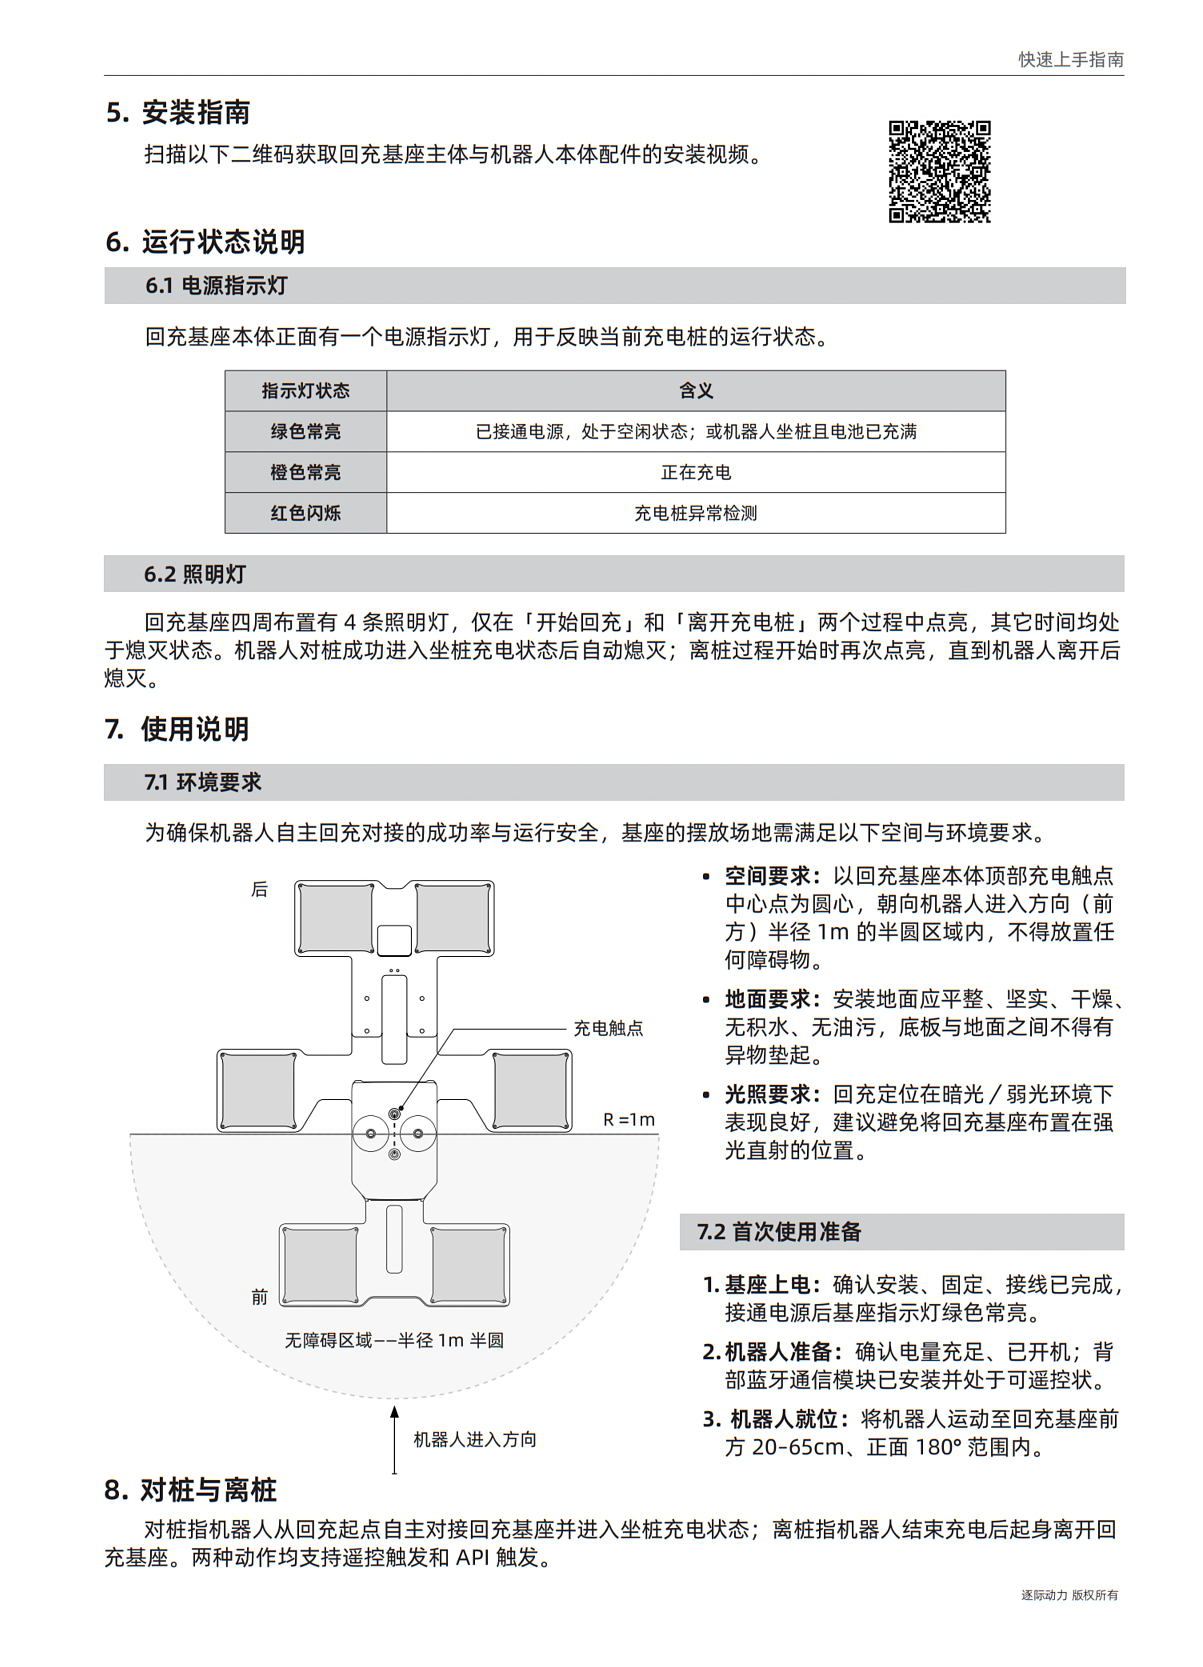
为确保机器人自主回充对接的成功率与运行安全,基座的摆放场地需满足以下空间与环境要求。
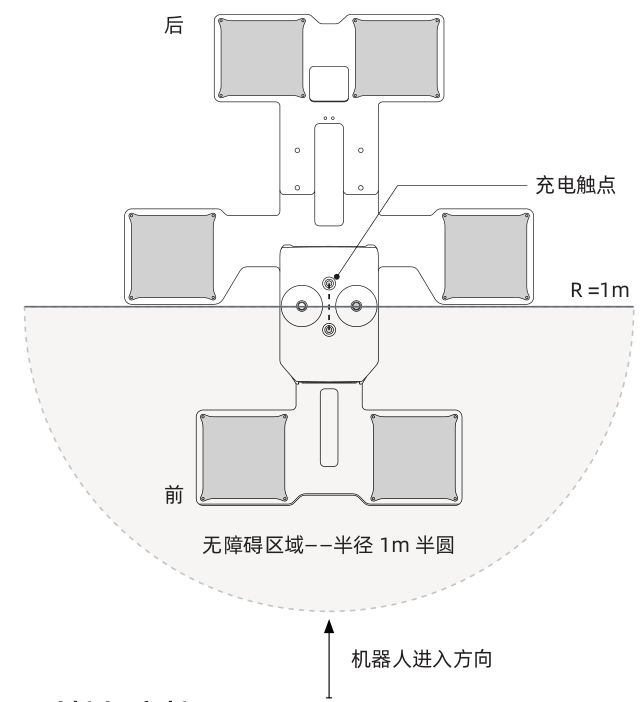
- 空间要求:以回充基座本体顶部充电触点中心点为圆心,朝向机器人进入方向(前方)半径 1m 的半圆区域内,不得放置任何障碍物(包括但不限于纸箱、设备、线缆、杂物等),确保机器人导航与对接路径畅通。
-
地面要求:安装地面应平整、坚实。地面应干燥、无积水、无油污,底板与地面之间不得有异物垫起。
-
光照要求:回充定位在暗光/弱光环境下表现良好,但在强光直射(如阳光直射、强照明)条件下可能因视觉定位受干扰导致回充失败。建议避免将回充基座布置在强光直射的位置下使用。
-
多基座间距:相邻基座的横向间距不得小于 1.1 m,纵向间距不得小于 1.4 m,均以充电触点中心点为测量基准。
4.1.2 首次使用准备
-
回充基座上电:确认回充基座已完成安装、固定与接线,并已上电(指示灯绿色常亮)。
-
机器人准备:确认机器人电量充足、已开机。背部蓝牙通信模块已安装,并处于可遥控/可接收指令状态。
-
机器人就位:机器人运动到达回充基座前方20–65cm、正面 180° 范围内的区域。
4.2 获取回充基座编号
每台回充基座拥有唯一蓝牙 ID,格式为 TRON2A_DOCK_XXXX,可扫描回充基座主体背面的二维码或者设备铭牌上的二维码获取。
4.3 对桩与离桩
机器人回充全流程包括对桩与离桩两个关键动作。对桩指机器人从回充起点自主对接回充基座并进入坐桩充电状态;离桩指机器人结束充电后起身离开回充基座,回到平地站立状态。两种动作均支持遥控触发和 API 触发。
两种触发方式
- 遥控触发:用于现场演示、人工介入、手动测试。直接由操作人员按手柄遥控器按键完成。
- API触发:用于 7×24 自主巡检。由客户的巡检/调度平台或机器人自主判断,在低电量、任务结束、远程召回等场景下触发。
4.3.1 遥控触发
通过遥控器按键可触发开始回充与离桩操作,坐桩为回充过程中的自动中间状态。各操作对应说明如下:
| 操作 | 按键 | 遥控器屏幕显示 | 说明 |
|---|---|---|---|
| 对桩 | L2 + X | Docking | 机器人自主前进到桩上方,缓慢蹲下,借助物理导向结构完成对位。 对桩前确保机器人到达回充基座前方 20~65cm 范围内。 |
| 坐桩充电 | — | Charging | 回充基座指示灯橙色常亮 |
| 离桩 | L2 + □ | Undocking | 机器人起身离开回充基座,完成后原地站立等待后续指令 |
提示:按下遥控按键后若感觉“没反应”,请稍等几秒。
当环境中存在多个回充基座时,遥控回充会自动连接已配对的默认基座;未设置默认基座可能连错桩,建议先在 Studio 完成配对。
蓝牙配对面板的 Studio 可视化功能正在开发中,敬请期待。
4.3.2 API触发
通过 SDK/API 调用触发回充指令。触发时必须包含目标回充基座的蓝牙 ID(格式 TRON2A_DOCK_XXXX),用于指定要点亮与对接的回充基座。
详细接口清单与典型场景详见 TRON2 SDK 开发指南 ,查找“回充基座”相关内容。
本 Wiki 内 SDK 相关文档见 开发者文档(SDK) 栏目。
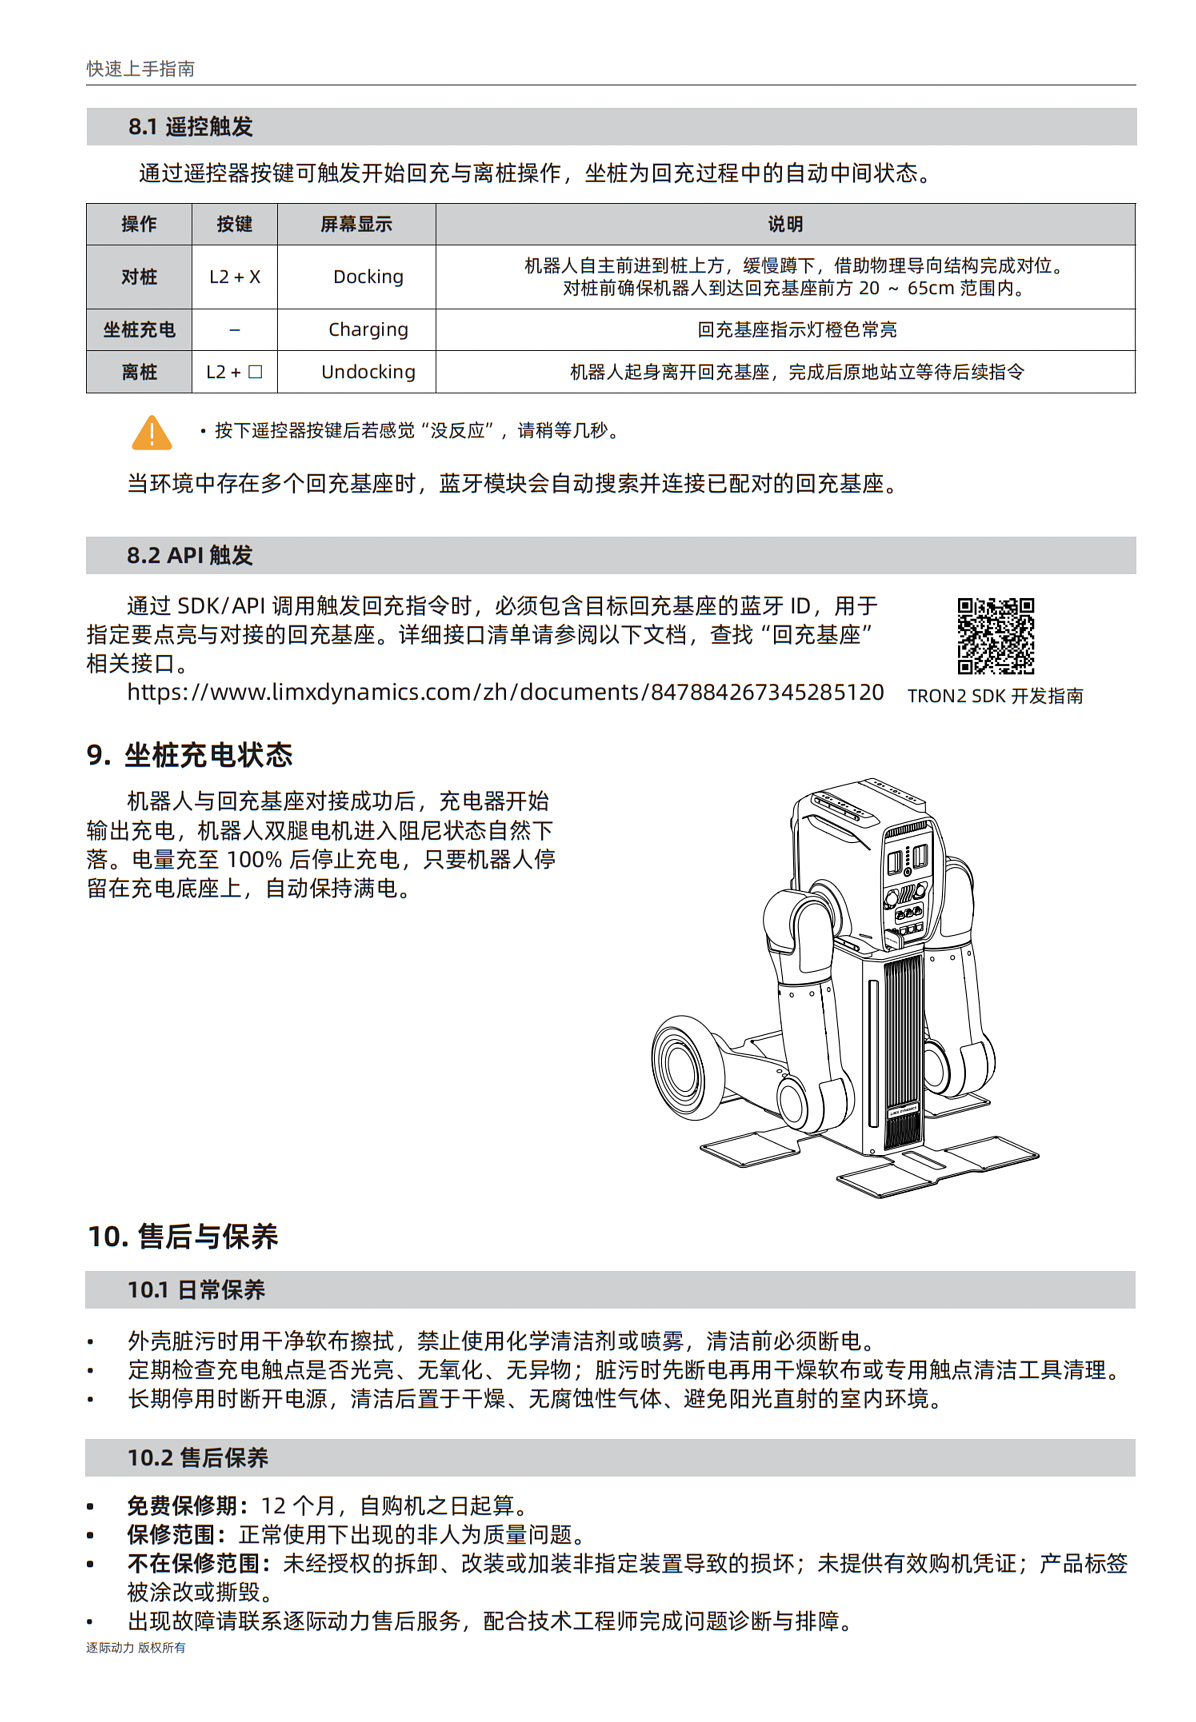
4.4 坐桩充电过程
-
机器人与回充基座对接成功后,充电器开始输出,开始充电。
-
充电开始后,机器人双腿电机进入阻尼状态自然下落。
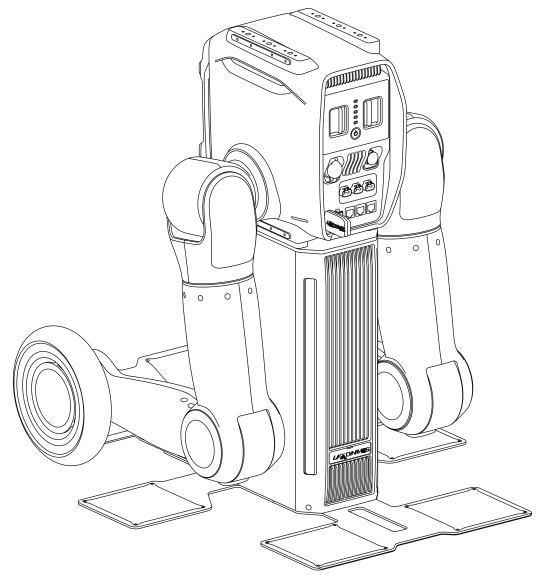
- 电量充至 100% 后停止充电;只要机器人停留在充电底座上,自动保持满电。
快速上手图版
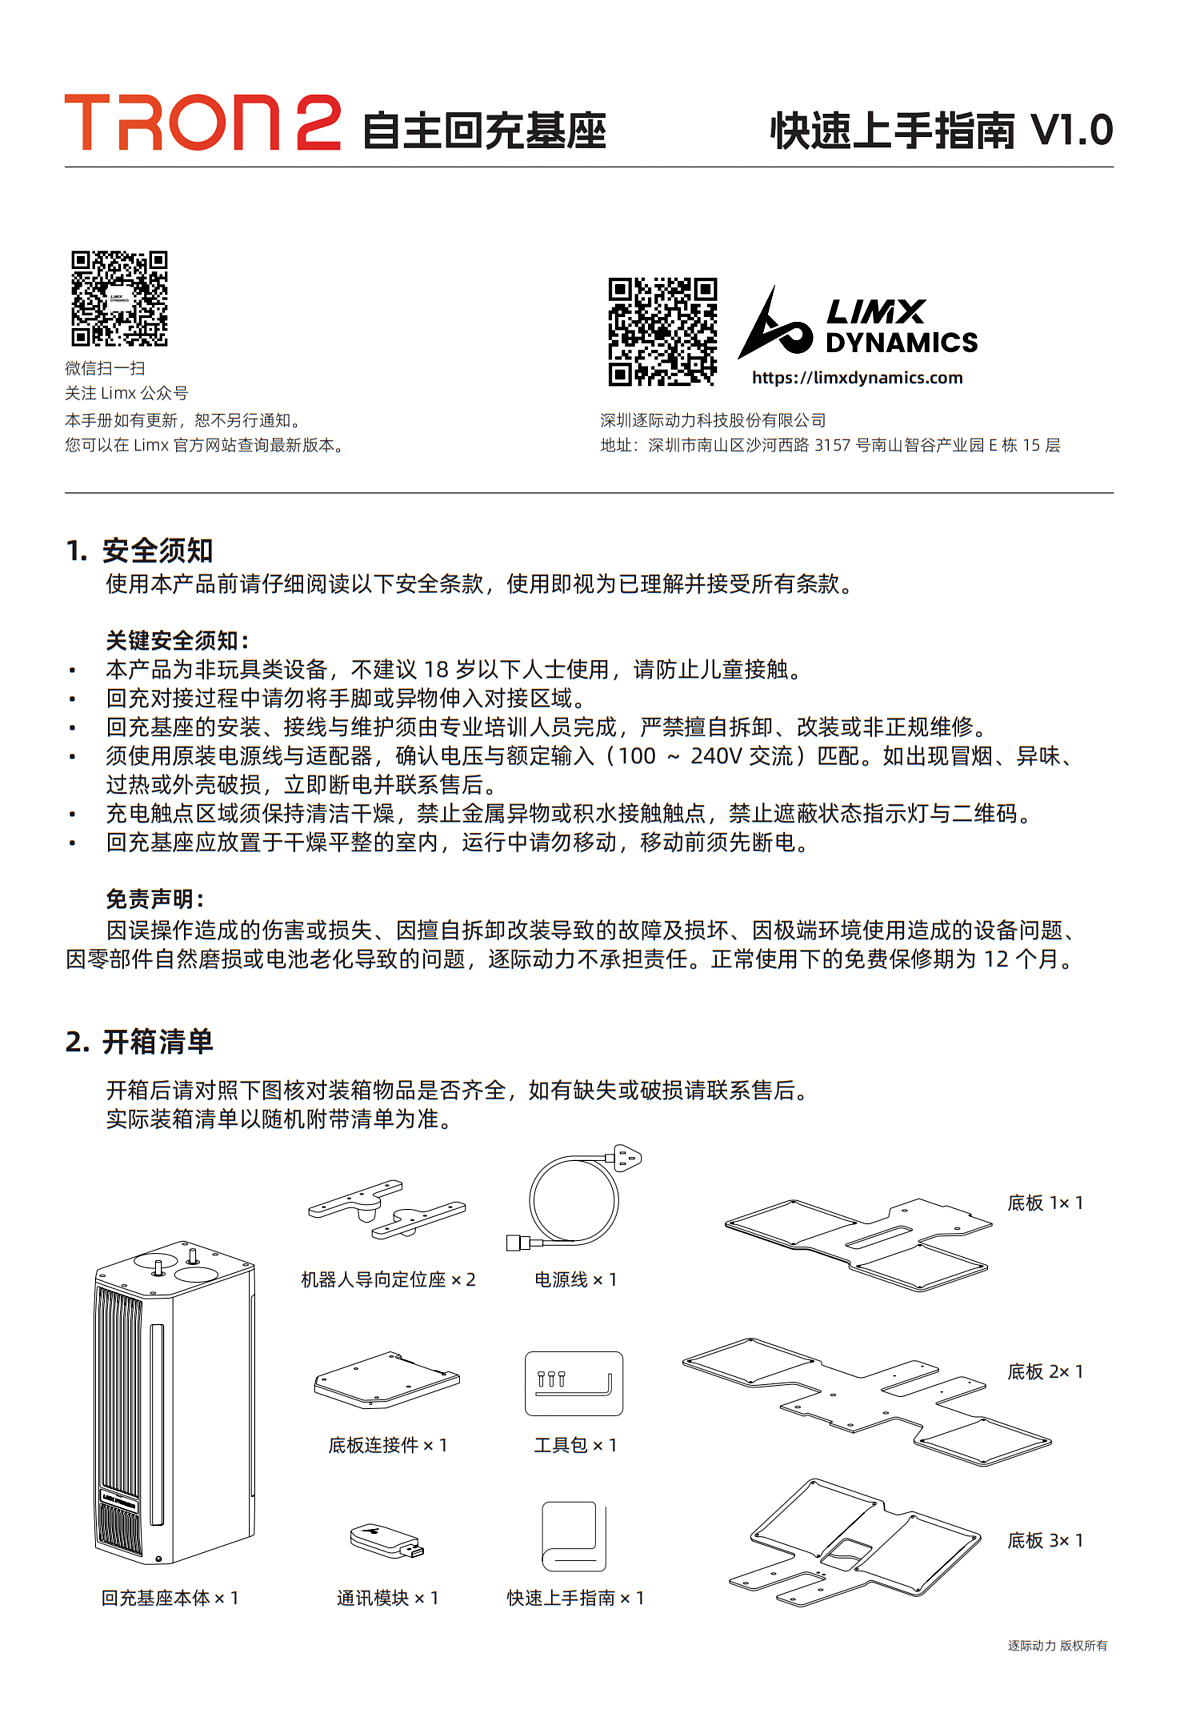
以下图片原样引用自 raw/tron-2/TRON2_Auto_Recharge_Base_Quick_Start_Guide-zh.md。该快上手文件原文仅有以下 4 张图片链接,没有任何文字;图中步骤说明请勿凭猜测编写,待人工补充步骤说明。
3.1 Power Indicator Light
The front of the charging dock has a power indicator that shows the dock's current operating status.
| Indicator Status | Meaning |
|---|---|
| Steady green | Powered on and idle; or the robot is docked and the battery is fully charged |
| Steady orange | Charging in progress |
| Flashing red | Dock fault detected |
3.2 Illumination Lights
Four illumination lights on the front of the charging dock assist the robot's visual positioning. They light up only during the Docking and Undocking processes and stay off at all other times.
-
Once docking is complete and the robot enters the Docked Charging state, the lights turn off automatically.
-
They light up again when undocking begins, then turn off once the robot has left the dock.
4.1.1 Environment Requirements
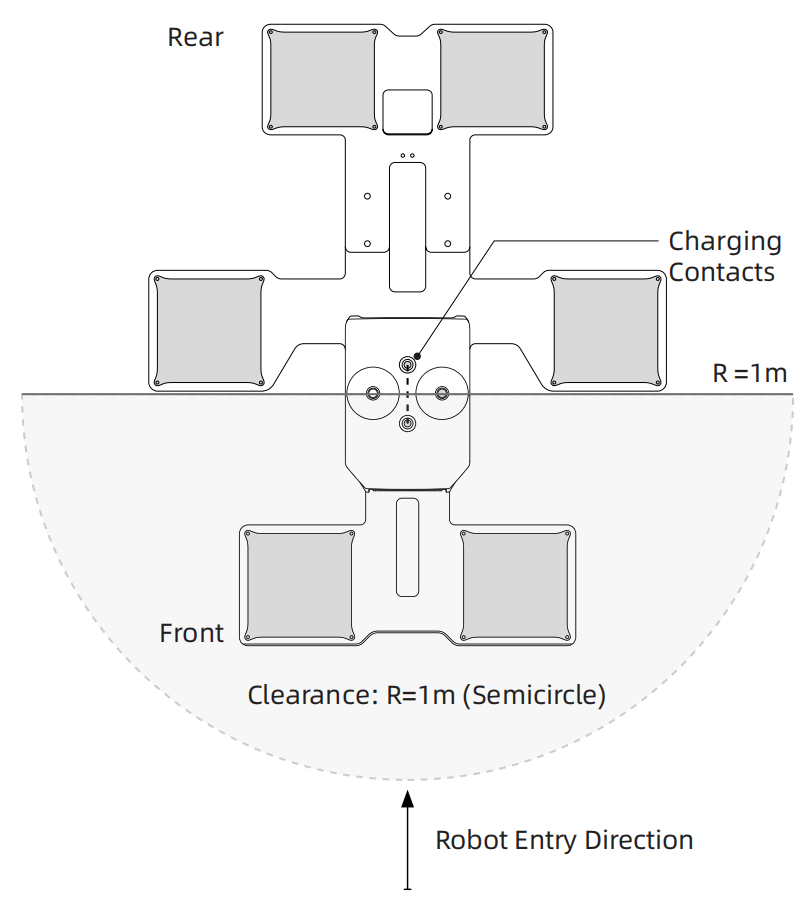
To ensure a high docking success rate and safe operation, the location where the dock is installed must meet the following spatial and environmental requirements.
- Space requirements: Keep the 1 m-radius semicircular area in front of the dock clear, using the center of the charging contacts as the center of the semicircle. Do not place boxes, equipment, cables, or other obstacles in this area, as they may obstruct the robot's navigation and docking path.
-
Floor requirements: The installation floor must be flat and solid, dry, free of standing water or oil stains, with nothing wedged between the base plates and the floor.
-
Lighting requirements: The docking system operates reliably in dim or low-light conditions. Strong direct light, including direct sunlight or high-intensity lighting, may interfere with visual localization and cause docking to fail. Install the charging dock away from strong direct light.
4.1.2 First-Time Setup
-
Power on the dock: Confirm that the charging dock has been installed, secured, and wired, and that it is powered on (the indicator shows steady green).
-
Prepare the robot: Confirm that the robot has sufficient battery charge and is powered on, and that the Bluetooth communication module on its back is installed and the robot is ready to receive remote-control or API commands.
-
Position the robot: Move the robot to a location 200–650 mm in front of the charging dock, within 180° of the dock's front face.
-
Charging Dock Spacing: Adjacent docks must be at least 1.1 m apart laterally and 1.4 m apart longitudinally, measured center to center between the Charging Contacts.
4.2 Getting the Charging Dock's Bluetooth ID
Each charging dock has a unique Bluetooth ID in the format TRON2A_DOCK_XXXX. You can obtain it by scanning the QR Code on the back of the dock or the QR Code on the device nameplate.
4.3 Docking and Undocking
The charging cycle consists of docking and undocking. During docking, the robot autonomously approaches the charging dock, aligns itself, and lowers itself onto the dock to enter the Docked Charging state. During undocking, the robot rises, leaves the dock, and returns to a standing position on level ground. Both actions can be triggered using the remote controller or API.
Two trigger methods
- Remote controller trigger: Used for on-site demonstrations, manual intervention, and manual testing. The operator triggers it directly by pressing buttons on the handheld remote controller.
- API trigger: Used for 24/7 autonomous inspection. Triggered by the customer's inspection/dispatch platform or by the robot's own logic, in scenarios such as low battery, task completion, or remote recall.
4.3.1 Triggering via Remote Controller
Use the remote controller buttons to start docking or undocking. Docked Charging begins automatically after docking and does not require a separate button command.
| Action | Buttons | Screen Display | Description |
|---|---|---|---|
| Docking | L2 + X | Docking | The robot autonomously approaches the dock, moves into position, and slowly lowers itself onto the physical guide structure for final alignment. Before docking, position the robot 200–650 mm in front of the charging dock. |
| Docked Charging | — | Charging | The charging dock indicator shows steady orange |
| Undocking | L2 + □ | Undocking | The robot stands up and leaves the charging dock. Once finished, it stands in place awaiting further commands. |
Tip: After pressing a remote controller button, if nothing seems to happen right away, wait a few seconds.
When multiple charging docks are present, triggering a charge via the remote controller automatically connects to the paired default dock. If no default dock has been set, the robot may connect to the wrong dock; pair the dock in Studio first.
The visual Bluetooth pairing panel in Studio is currently under development and will be available in an upcoming release.
4.3.2 Triggering via API
Recharging commands can be sent through the SDK or API. Each command must include the target dock's Bluetooth ID in the format TRON2A_DOCK_XXXX, allowing the robot to identify and activate the correct dock.
For the full list of interfaces and typical use cases, see the TRON 2 SDK Development Guide and look for the section on the charging dock.
4.4 Docked Charging
-
Once the robot has successfully docked with the charging dock, the charger begins delivering power and charging starts.
-
After charging begins, the leg motors enter the Damping State, allowing the robot to settle naturally onto the dock.
-
Charging stops when the battery reaches 100%. While the robot remains docked, the charging system maintains a full charge automatically.
待人工确认事项
- 快速上手图版:快上手文件原文仅 4 张图片、无任何文字说明,图中的安装/操作步骤含义待人工看图补充说明文字,并核对图片顺序是否对应实际步骤顺序。
- 坐桩充电过程步骤编号:手册 §4.4 原文第三条步骤编号印为"1."(位于图片之后),疑为原文排版编号错误,本页按原文原样保留,请人工核对原手册。
- 手册 §4.3.1 提到"建议先在 Studio 完成配对"及"蓝牙配对面板的 Studio 可视化功能正在开发中",Studio 配对操作细节手册未给出,待后续资料导入后补充。